SumoSlang for Dummies
SumoSlang is a very powerful tool for developing your own "customized" process models. The purpose of this little document is to provide a tour through a stripped down version of the SumoSlang language. To highlight the features that will be familiar to someone with a basic understanding of process modelling and simulation and help get you started on building your own custom models so that you can "learn by doing". So SumoSlang for Dummies, or maybe SumoSlang for Doers... call it what you want.[0]
The tutorials are organized as follows:
- The first is really the most basic use of SumoSlang to develop a model that maps flow and state variable components
SV from an Influent element, through a basic CSTR and into an Effluent element. SV components are directly mapped with no reactions performed. Not very interesting but a good place to start.
- In the second tutorial we add reactions to the basic CSTR developed in the previous tutorial. Now the model starts to be useful.
- In the third, we look at using parameters
PAR and calculated variables CVAR . What do they add to the model, how are they tracked and how do they leverage SUMO's Model Base?
- The fourth and final tutorial will add the missing information to make our basic CSTR compatible with other flow elements in the SUMO process unit library.
This is by no means intended as an exhaustive treatment of what SumoSlang can do and the reader is referred to the BoSS[1] as the definitive reference on SumoSlang. Nevertheless, I hope these four tutorials are enough to provide you with the basic knowledge and confidence required to start building your own models.[2] If you prefer not to follow the steps outlined below you can also download the tutorial files and use them as templates for getting started on your own.
Tutorial One: A basic CSTR
-
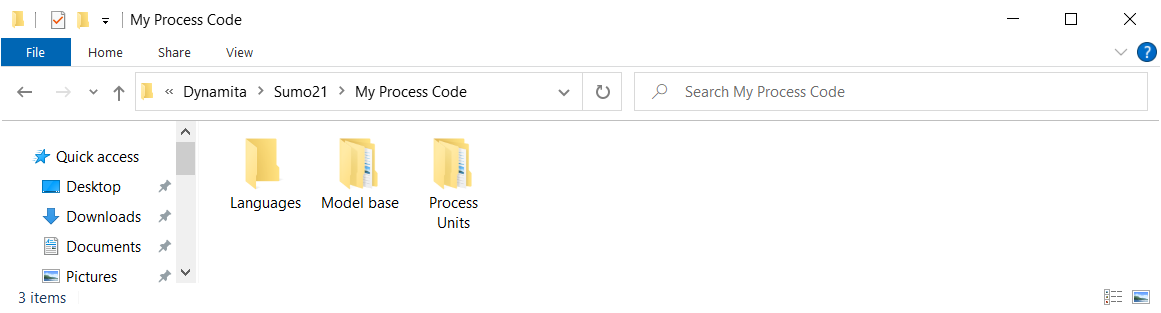
Find the folder where you have SUMO installed. On my computer it is
C:\Users\cdhou\AppData\Local\Dynamita\Sumo21. There should be a folder here named "My
Process Code" and inside of that you will find "Process Units" and "My Process Unit Category". This is where we are going to work.[3]
-
For a "basic CSTR" we will create a folder named
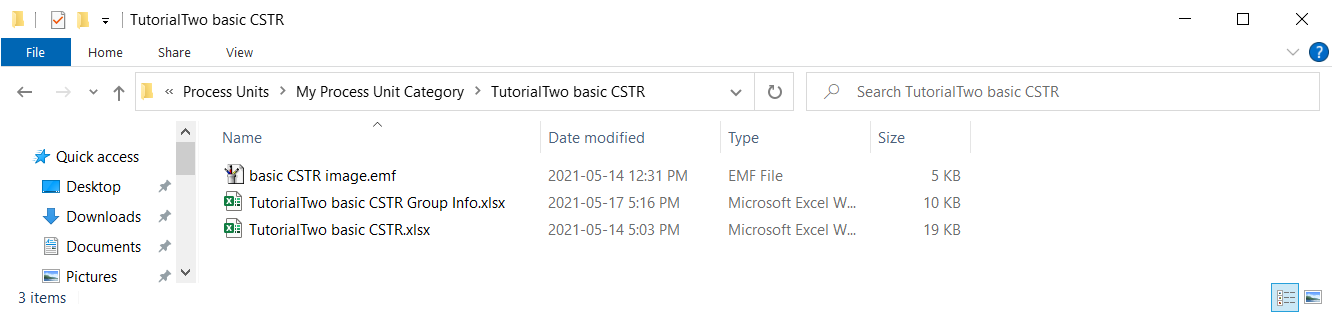
\TutorialOne basic CSTR containing the following three files[4]:
basic CSTR image.emf which is an image file to visually represent the process unit on the SUMO drawing board,TutorialOne basic CSTR Group Info.xlsx which is an Excel file to explain to SUMO the organization and use of the files in this folder.TutorialOne basic CSTR.xlsx which is the Excel file which contains the actual code describing the process unit model.

-
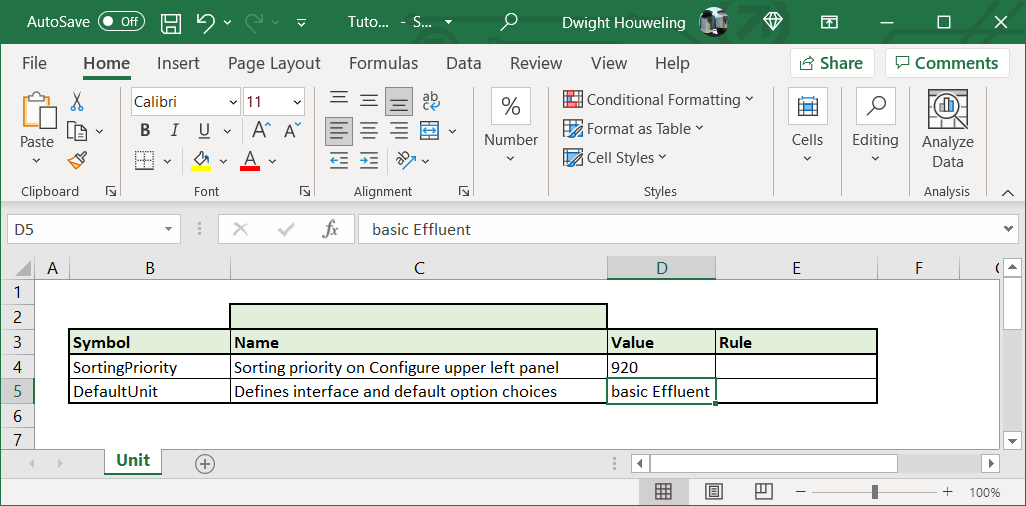
Now we use the "Group Info" file to instruct SUMO on how this folder is organized. At its most basic level,
TutorialOne basic CSTR Group Info.xlsx must be organized with the following elements:
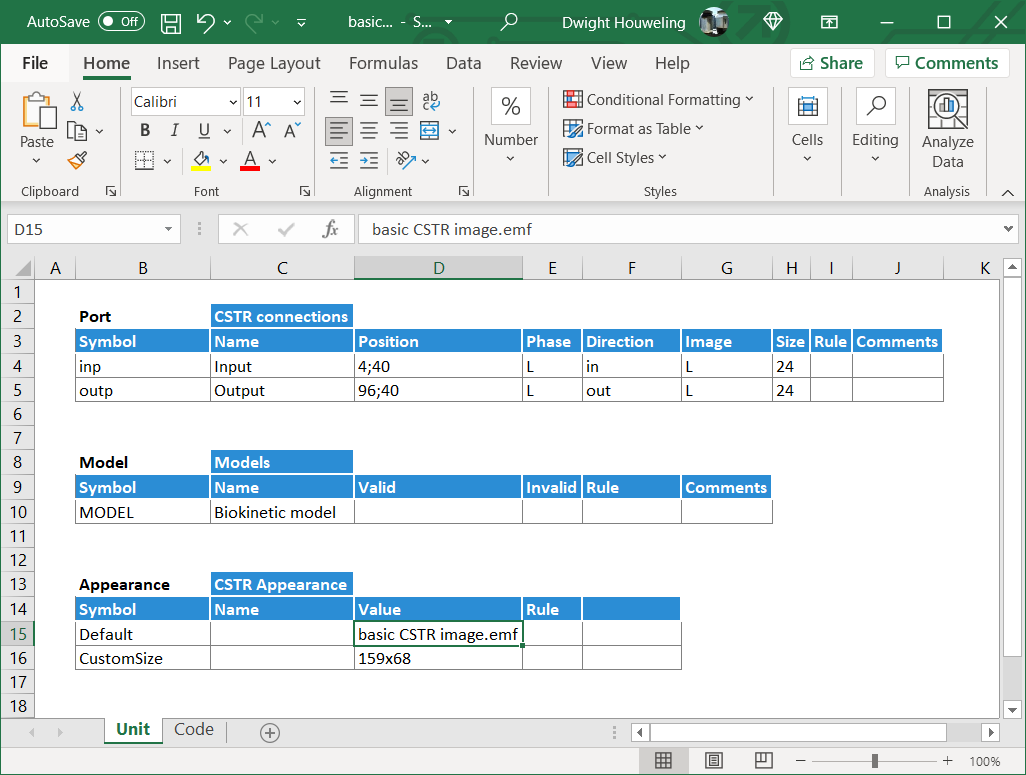
- A worksheet named
Unit containing a table with the column headings Symbol, Name, Value and Rule.
- Rows to identify the
SortingPriority and DefaultUnit. Note that DefaultUnit refers to the name of the Excel file in the current folder where the Sumo Model Translator (SMT) should look for process unit model code.
SMT is pretty strict about how it wants to see this information presented. Apart from the font, coloring and style of the table, which are optional, it should look exactly like this:

-
Inside
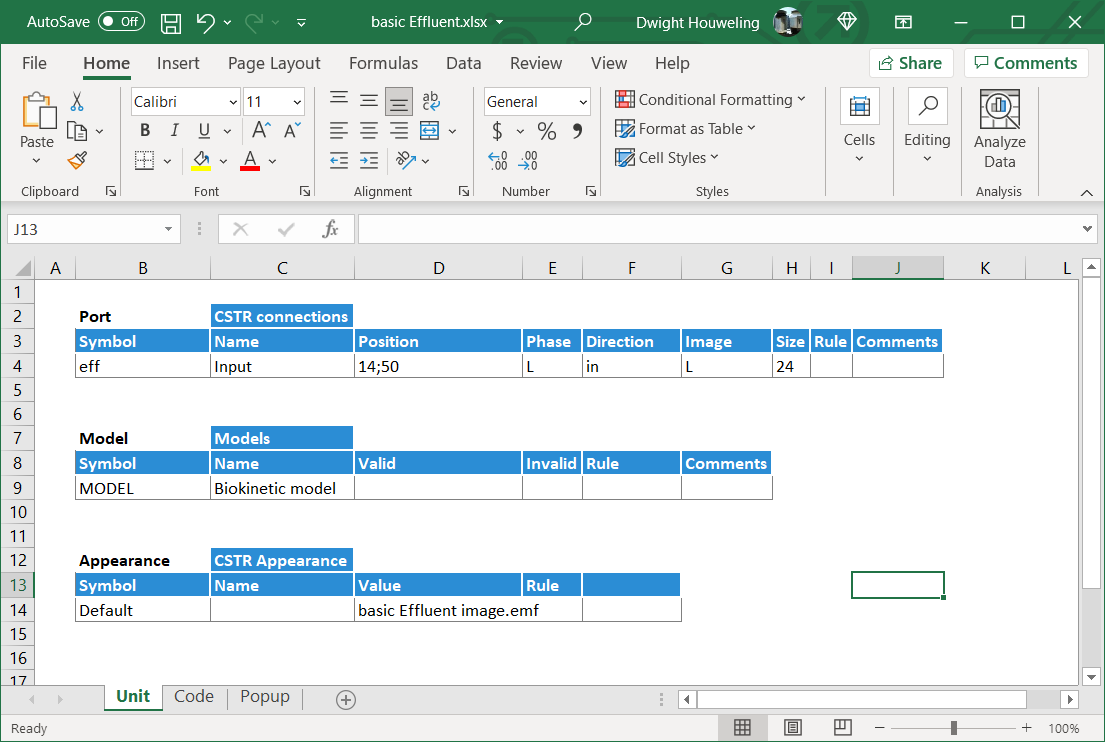
TutorialOne basic CSTR.xlsx we need to include two worksheets named Unit and Code. The Unit worksheet needs to include three tables:
- The
Port table which explains the number of connections that can be made to the element, how they should be named, and more.
- The
Model table which identifies which are valid and invalid biokinetic models that can be associated with this model file.
- And the
Appearance table which identifies which image file from the working folder should be displayed on the drawing board.
Again, the SMT is strict about how it wants to see this information presented. Notably, tables need to start in column B and the column naming and structure of the tables needs to be respected. It is best to follow the example provided below or work from the template \My Process Code\Process Units\My Process Unit Category\TutorialOne basic CSTR.xlsx which you can download from here.
-
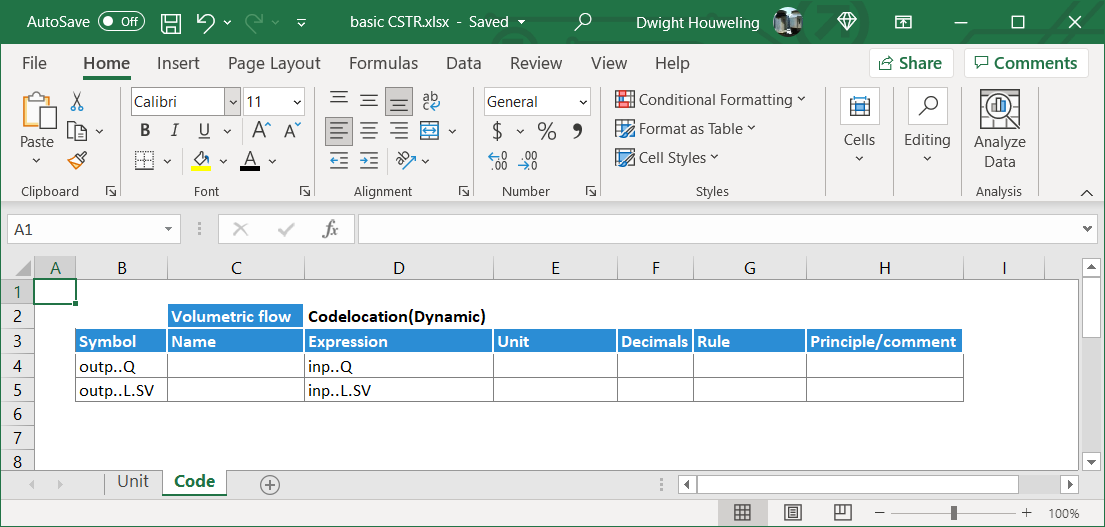
The
Code worksheet can be even simpler. In this tutorial we make it a single table that includes two lines:
- Cells
$B$4 and $D$4 which, respectively, assign the value of the flow in the output outp..Q to the value of the flow in the input inp..Q. Simple mapping of the inlet flow to the outlet.
- Cells
$B$5 and $D$5 which, respectively, assign the value of the state variables in the output outp..L.SV to the value of the flow in the input inp..L.SV. Simple mapping of the inlet state variables to the outlet with no transformations or conversions. Boring, I know, but a good place to start. Patience young grasshopper!
It's worth noting here that inp..L.SV is SumoSlang's, well... "slang" for all of the state variables in the input stream to the "basic CSTR"[5]. And, if we are more precise, it is actually the liquid phase state variables and so excludes gas phase state variables (i.e. bubbles and headspace) which are assumed in most cases to not travel between CSTRs. And maybe one final point, the definition of the input is in fact anything connected to the port location identified in Unit worksheet cell $D$5. But it's actually not necessary to understand all of that detail. A lot can be accomplished just by carefully following and tweaking the template files.
-
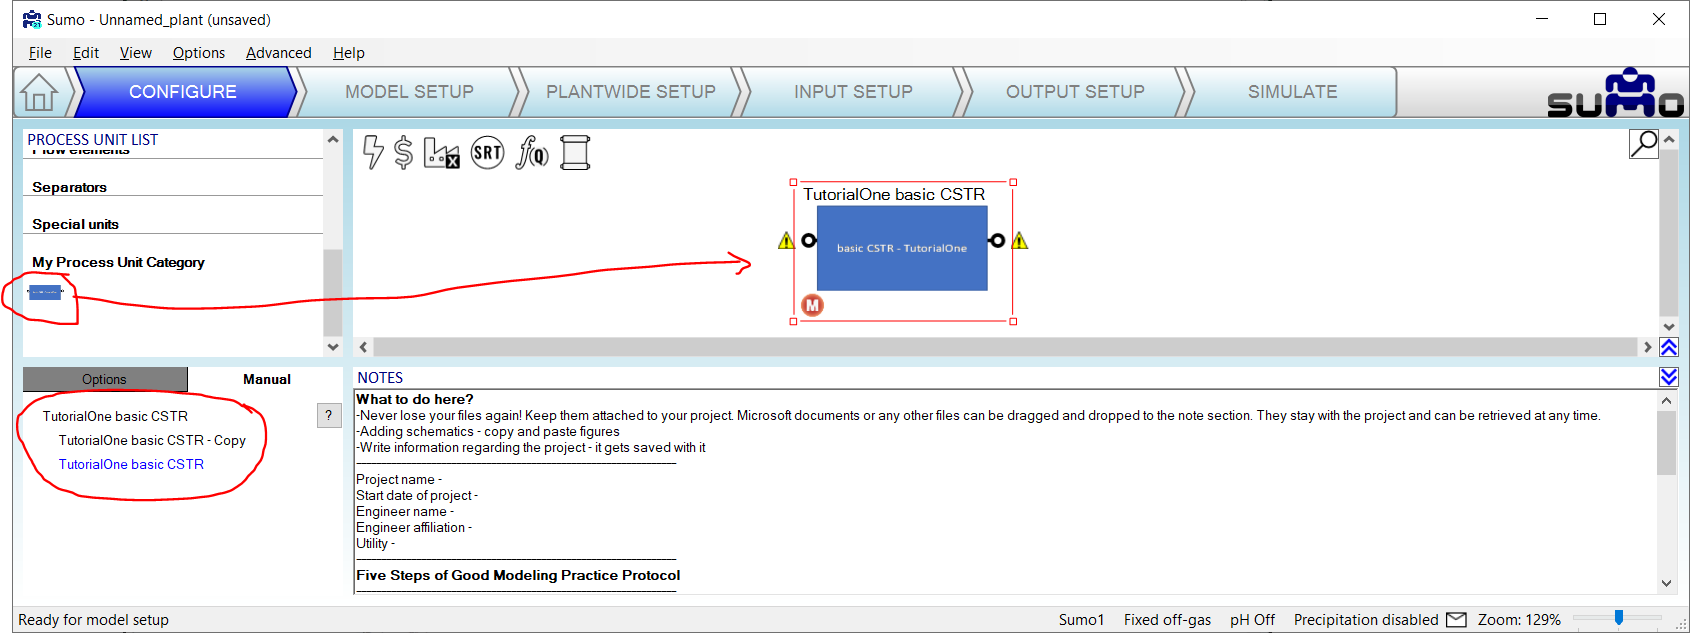
Now we open SUMO to see if we have successfully created our
TutorialOne basic CSTR. We find that our new category My Process Unit Category appears to the left of the SUMO drawing board along with the standard library of SUMO process units. We can drag our unit to the drawing board where it is given the name of our folder \TutorialOne basic CSTR and, by looking in the bottom left hand corner under Manual, we see that the process unit file referenced is also named TutorialOne basic CSTR.xlsx.[6]
Note if you created a copy of TutorialOne basic CSTR.xlsx in the \My Process Unit Category folder then it would also appear in this list as shown below. This is a useful feature in cases where you want to have alternate versions of your process unit code.
-
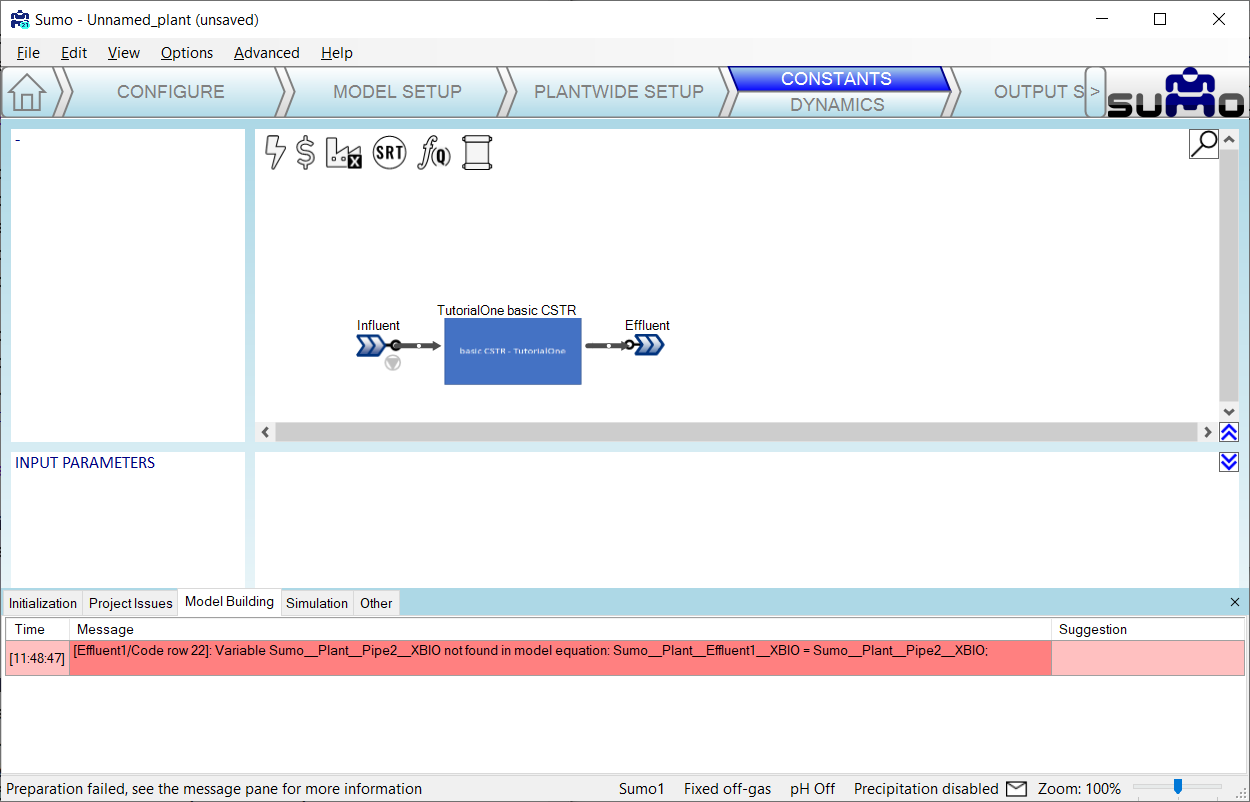
The model above will build, but if we try to connect the influent and effluent flow elements then we get a build error related to the inability to calculate
XBIO in the effluent object. The reason for this is that the standard library "Effluent" object in SUMO is looking for parameters in addition to the Q and L.SV which were mapped to the outp.. in TutorialOne basic CSTR.xlsx. So for this tutorial we cannot use the standard library Effluent object. Instead we will create a TutorialOne basic Effluent element inside \My Process Unit Category.
-
Creating a "basic Effluent" object is very similar to creating the "basic CSTR". First we start with the folder structure as shown below:

-
The
Group Info file TutorialOne basic Effluent Group Info.xlsx looks very similar to TutorialOne basic CSTR Group Info.xlsx:
-
The
Unit worksheet in basic Effluent.xlsx is also very similar to TutorialOne basic CSTR.xlsx with the exception that there is now only an input port which, somewhat ironically, we name "eff":
-
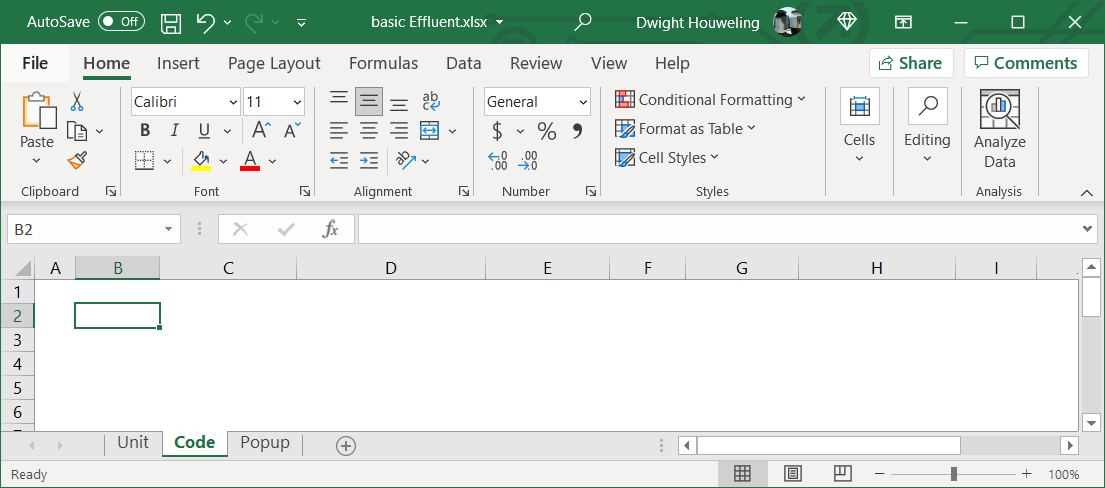
So with only an input, and no output, the effluent object doesn't even need to map variables from one port to another. The
Code worksheet can therefore be completely empty:
-
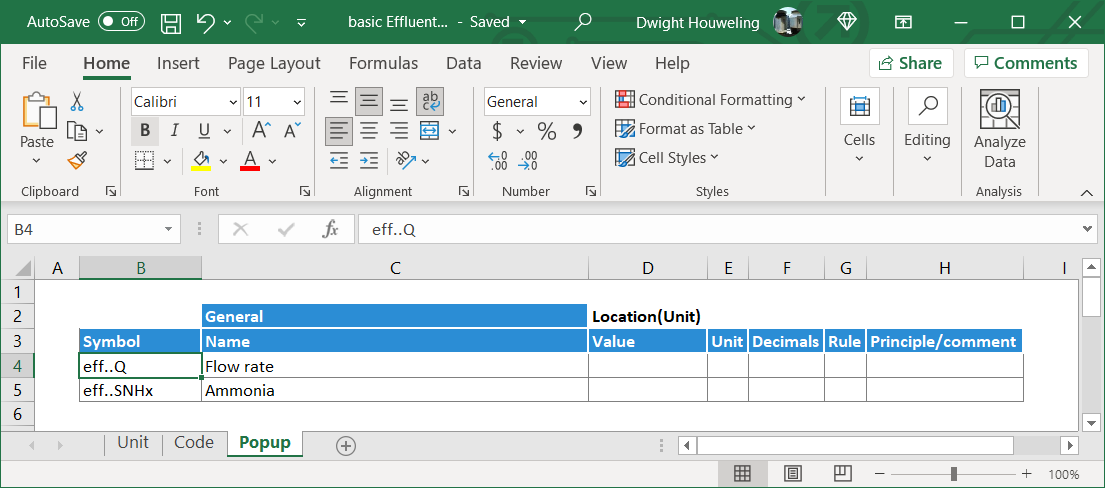
But in this case we will add a
Popup worksheet that will allow display of model variables. We will display flow Q and ammonia SNHx:
-
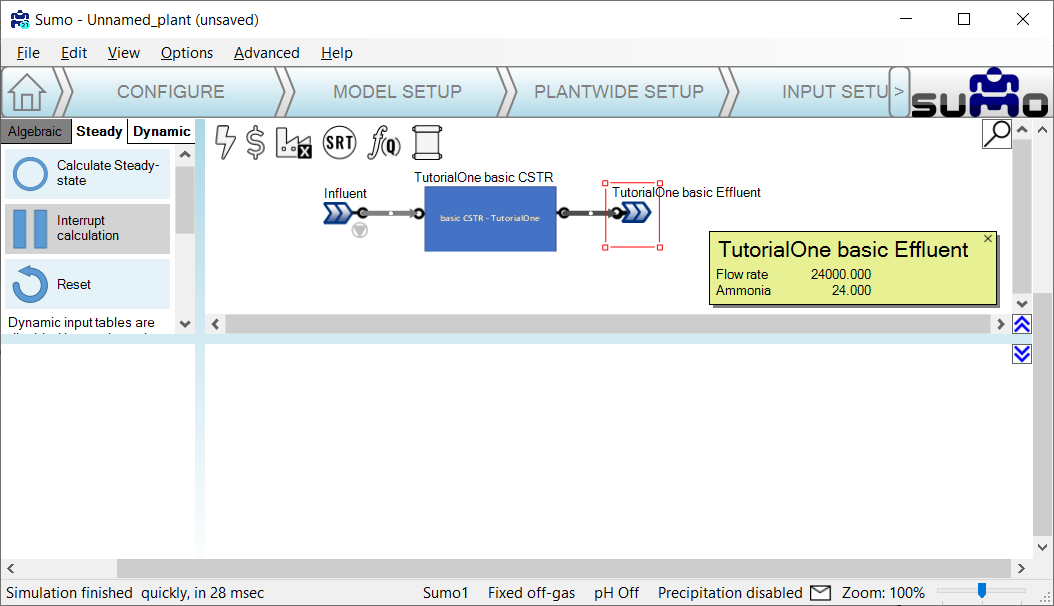
Now we open SUMO again and find that when we connect an
Influent from the Flow elements category together with our TutorialOne basic CSTR and TutorialOne basic Effluent from the My Process Unit Category then we can successfully build a model. And when we simulate in steady state and then place our cursor over the effluent element, we see from the popup that the model has successfully mapped the influent flow from the influent element, through our basic CSTR and in the effluent element.
-
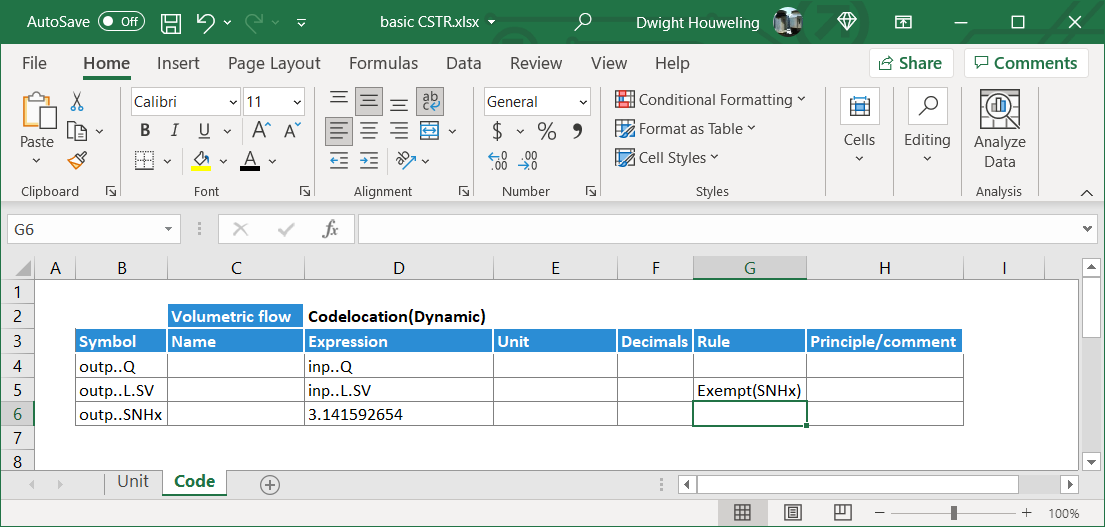
That's it, a new model has been created using SumoSlang to map flow and components from the inlet to the outlet of a CSTR. Maybe as one final exercise, try making the change below to the
Code worksheet in basic CSTR.xlsx. Is the new value of outp..SNHx correctly mapped to the effluent object when you run steady state in SUMO? What happens if you omit the rule Exempt(SNHx) in cell $G$5?
Summary of Tutorial One:
Tutorial One demonstrated how to strip SumoSlang down to its most basic nuts and bolts. The result is a trivial model: influent flow and components are mapped across a reactor to an effluent without any reactions or transformations. Nothing more than this: In => Out. This isn't very interesting. But the power of SumoSlang will be revealed in how it scales. Any model coded once can be then be reused multiple time to build very complex models, far beyond the scale you would ever be able to program in Excel, Python, Matlab or whatever happens to be your programming tool of choice. In addition, SumoSlang leverages a Model Base that includes a vast library of components with associated biokinetic, water chemistry, and gas transfer processes. We will explore how SumoSlang interacts and leverages the Model Base in the next tutorial.
Tutorial Two: Introducing Conversions
At its heart, process simulation is about solving the following mass balance across the Process Units:
Change in Mass of Component X with respect to time = Mass Flow of X in - Mass Flow of X out + Conversion rate of X
The Conversion rate of X in the above equation is what we think about when we talk about "ASM" or "Activated Sludge Models". In many cases, it is the most interesting part of the model and where most of the complexity lies. But even though it is possible to directly code ASM process equations in the Code worksheet of the Process Units ,in our case the basic CSTR.xlsx, this would not be the best way to use SumoSlang. In SumoSlang, the code for the ASM-type models are referred to as the Model Base and kept separately from the code for the Process Units. One way to think about this is that the Conversion rate of X in the mass balance described above is coded in the Model Base whereas the rest of the mass balance equation is coded in the Process Units.
The separation of code for the Model Base and Process Units is shown in the folder structure below.
The advantage of this separation is that the Process Units code can be used with different Model Base codes. And new constituents added to the Model Base, one might for example want to add PFAS, are automatically pulled into and compatible with the Process Units code. There is no need to update the code for each of the 30+ models coded in the Process Units folder structure. What a relief! So let's get started building reactions into our basic CSTR.
-
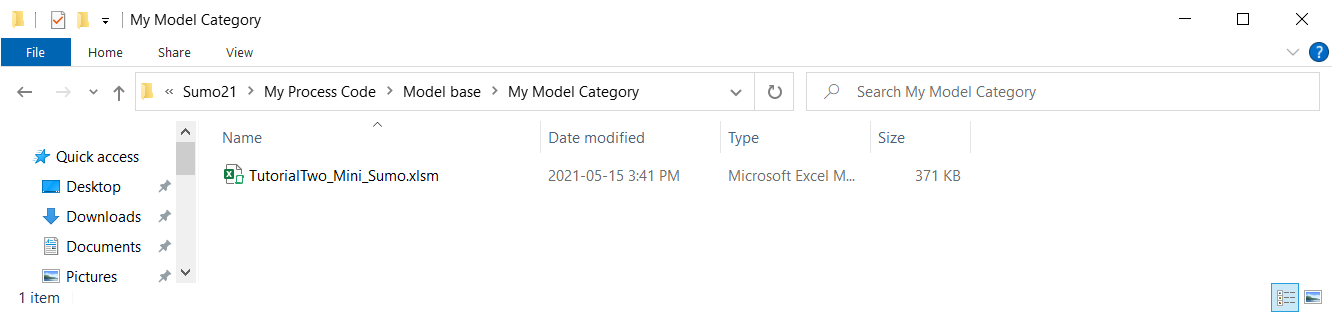
In the standard SUMO "Process code" folder, locate the "Mini_Sumo.xlsm" file. On my computer it is located at
C:\Users\cdhou\AppData\Local\Dynamita\Sumo21\Process code\Model base\Full plant models. Copy this file into the "Model base" folder in the parallel "My Process code" folder structure and rename it TutorialTwo_Mini_Sumo.xlsx. In my computer it is C:\Users\cdhou\AppData\Local\Dynamita\Sumo21\My Process Code\Model base\My Model Category and looks as follows:
-
This model file contains all of the biokinetic processes, stoichiometry and parameters required to describe the conversion rates of our model components. But to start, in the spirit of making things as simple as possible, we are going to reduce the complexity of this model to that of a simple nitrification model. In the
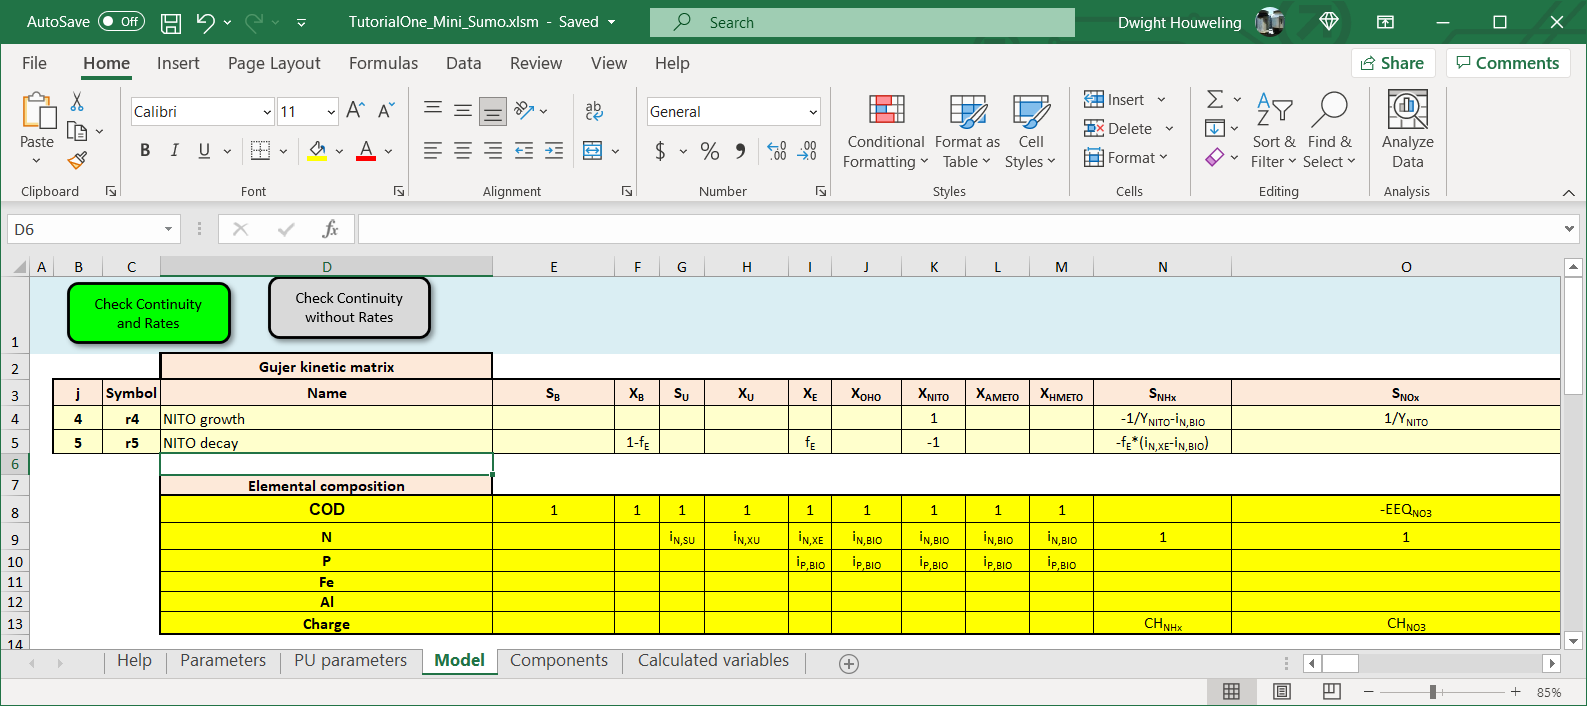
Model worksheet, delete rows 4-6 (corresponding to r1, r2 and r3) as well as rows 9-29 (corresponding to r6 to r26). This should leave you with only r4 and r5, which represent the growth and decay of nitrifying organisms XNITO.
-
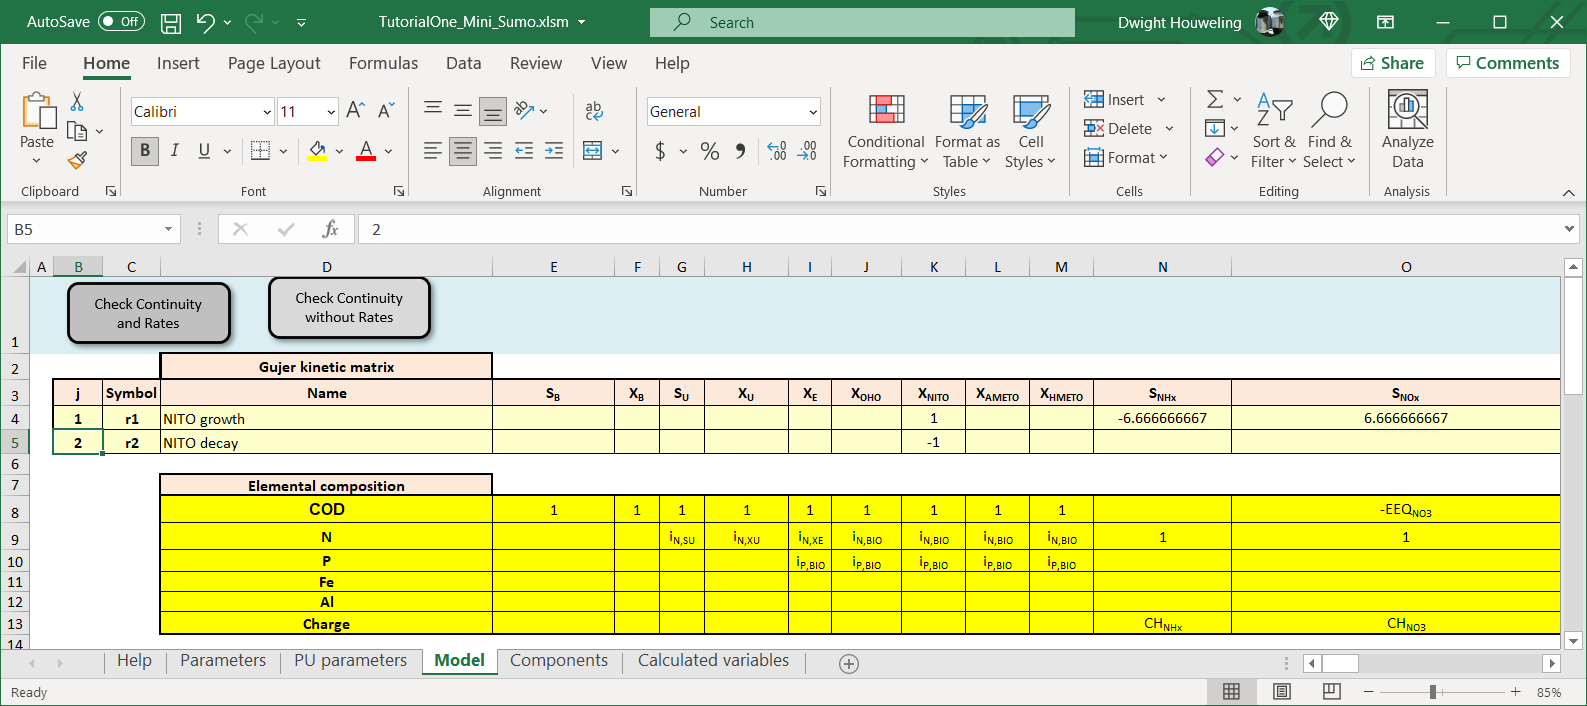
Correct the numbering in columns B and C so that these two processes are identified as "1", "2", "r1" and "r2". Then edit the cells of the stoichiometric matrix so that instead of showing symbolic parameters, only hardcoded numeric values are shown. By doing this we are "deparametizing" the model[7]:
-
Below is the
TutorialTwo_Mini_Sumo.xlsx with all process deleted except NITO Growth and Decay. The stoichiometric matrix contains symbolic or "parametized" terms like 1/YNITO which we want to "deparametize":
-
The "deparametized" version is shown below with only four stoichiometric terms remaining to describe growth (+1) and decay (-1) of nitrifiers
XNITO and the utilization of ammonia SNHx (-6.667) and generation of nitrate SNOx (+6.667) associated with growth of nitrifiers[8]. We will ignore all other stoichiometric terms like XB, XE, SALK or even dissolved oxygen SO2 for this simplified case:
-
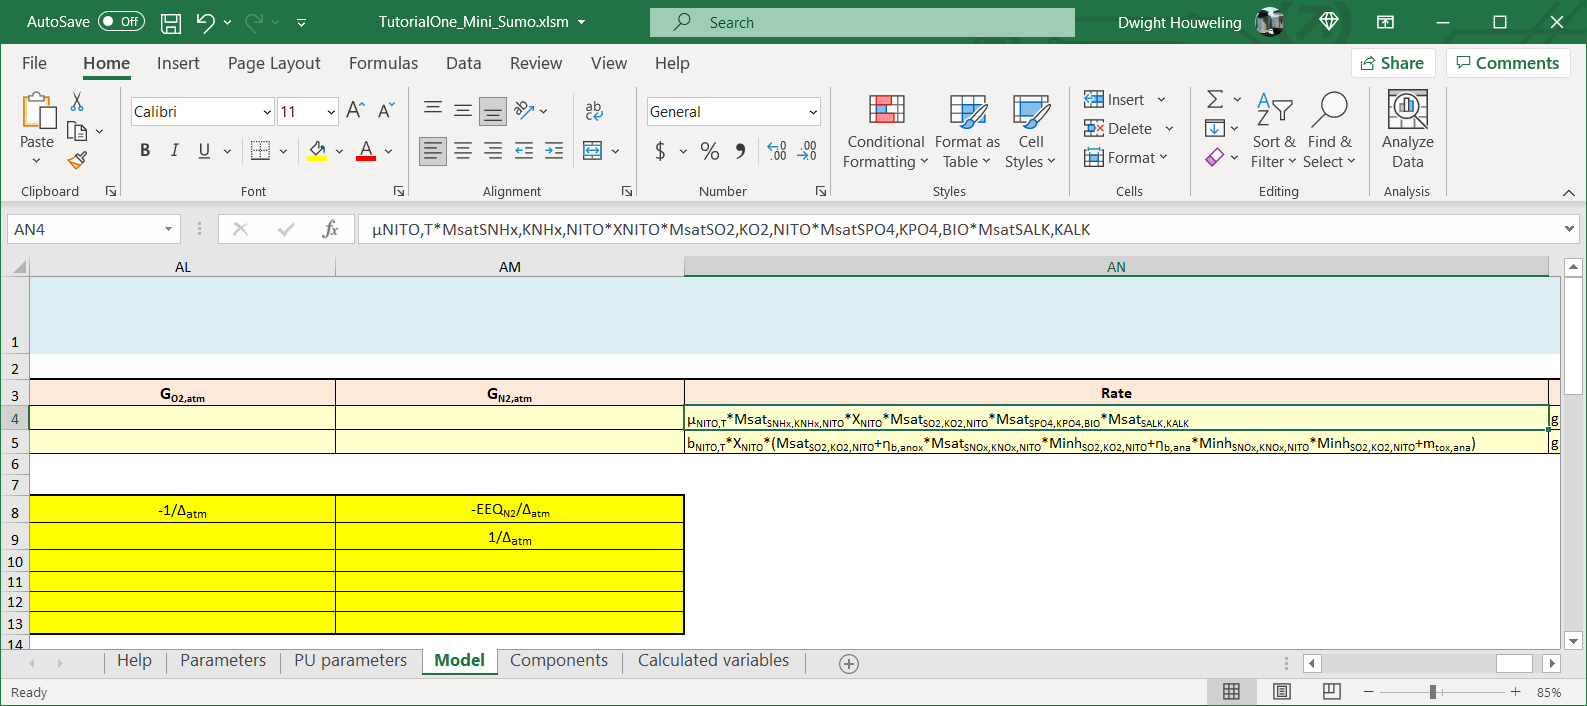
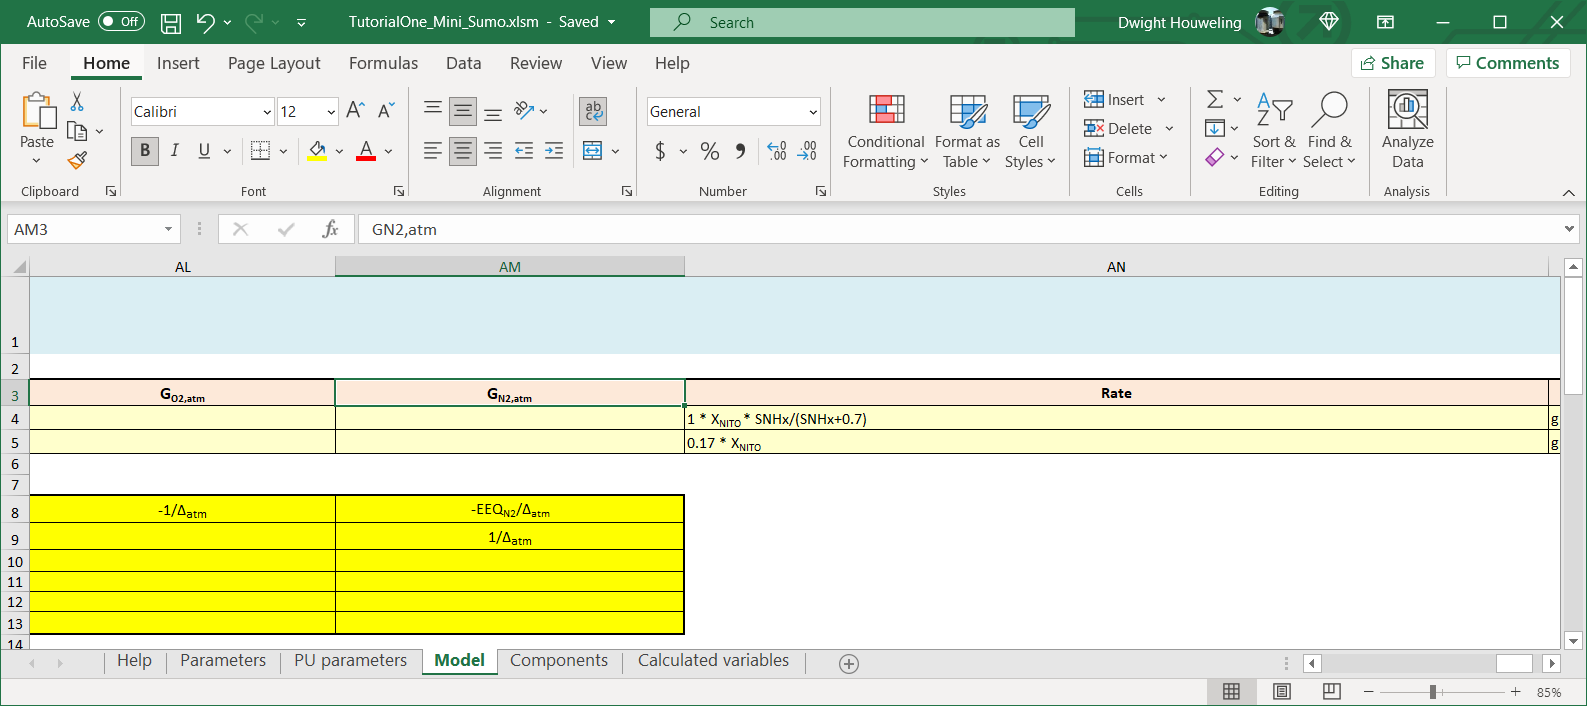
Finally we simplify the process rate equations from:
-
To the following which only relies on definitions of State Variables
XNITO and SNHx but otherwise does not contain any symbolic parameters:
-
There is a second stoichiometric matrix below the one we have been manipulating that contains "evaluated" terms for the stoichiometric matrix and reaction terms, i.e. numbers not letters. You can update this second matrix by clicking on the "Check Continuity and Rates" button. However, it is not necessary to do this. The SUMO Model Translator (SMT) will ignore this second matrix.
-
We now create a new folder where we will develop the
TutorialTwo basic CSTR:
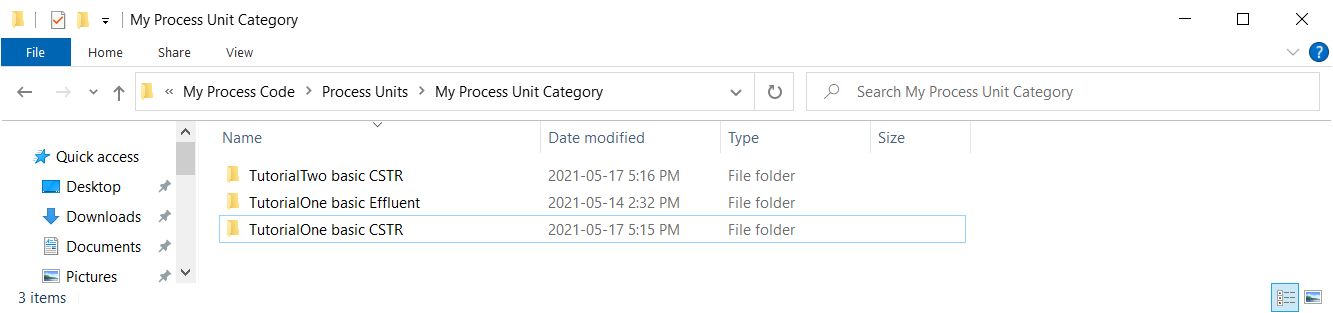
-
We can copy the three files from the
\Tutorial One basic CSTR into \Tutorial Two basic CSTR but we need to update the names of the Excel files as follows:
-
The update to the "Group Info" file is to update the name of the file where the process code is located:
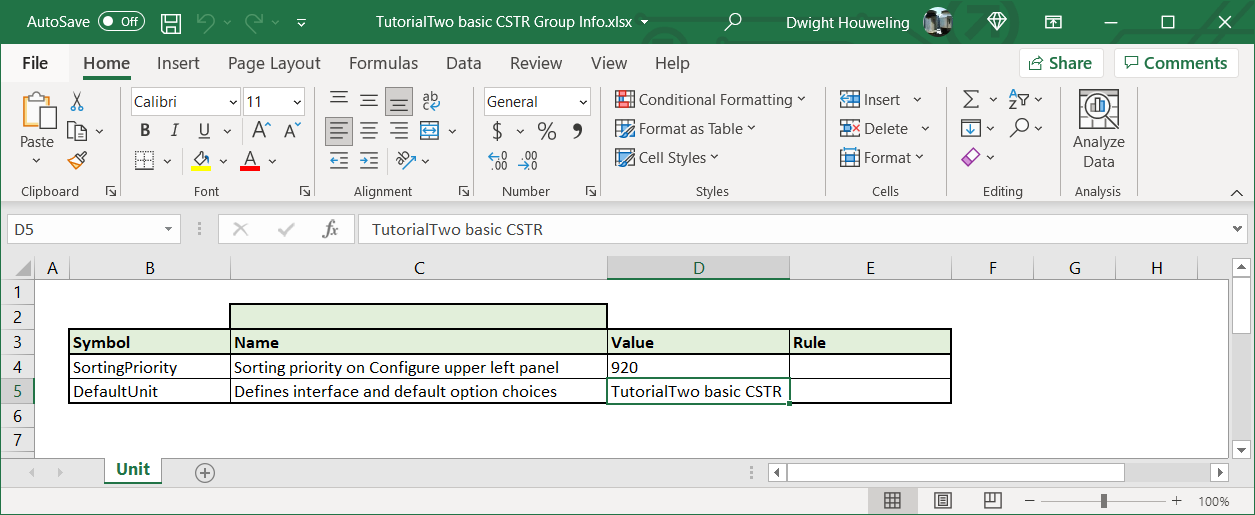
-
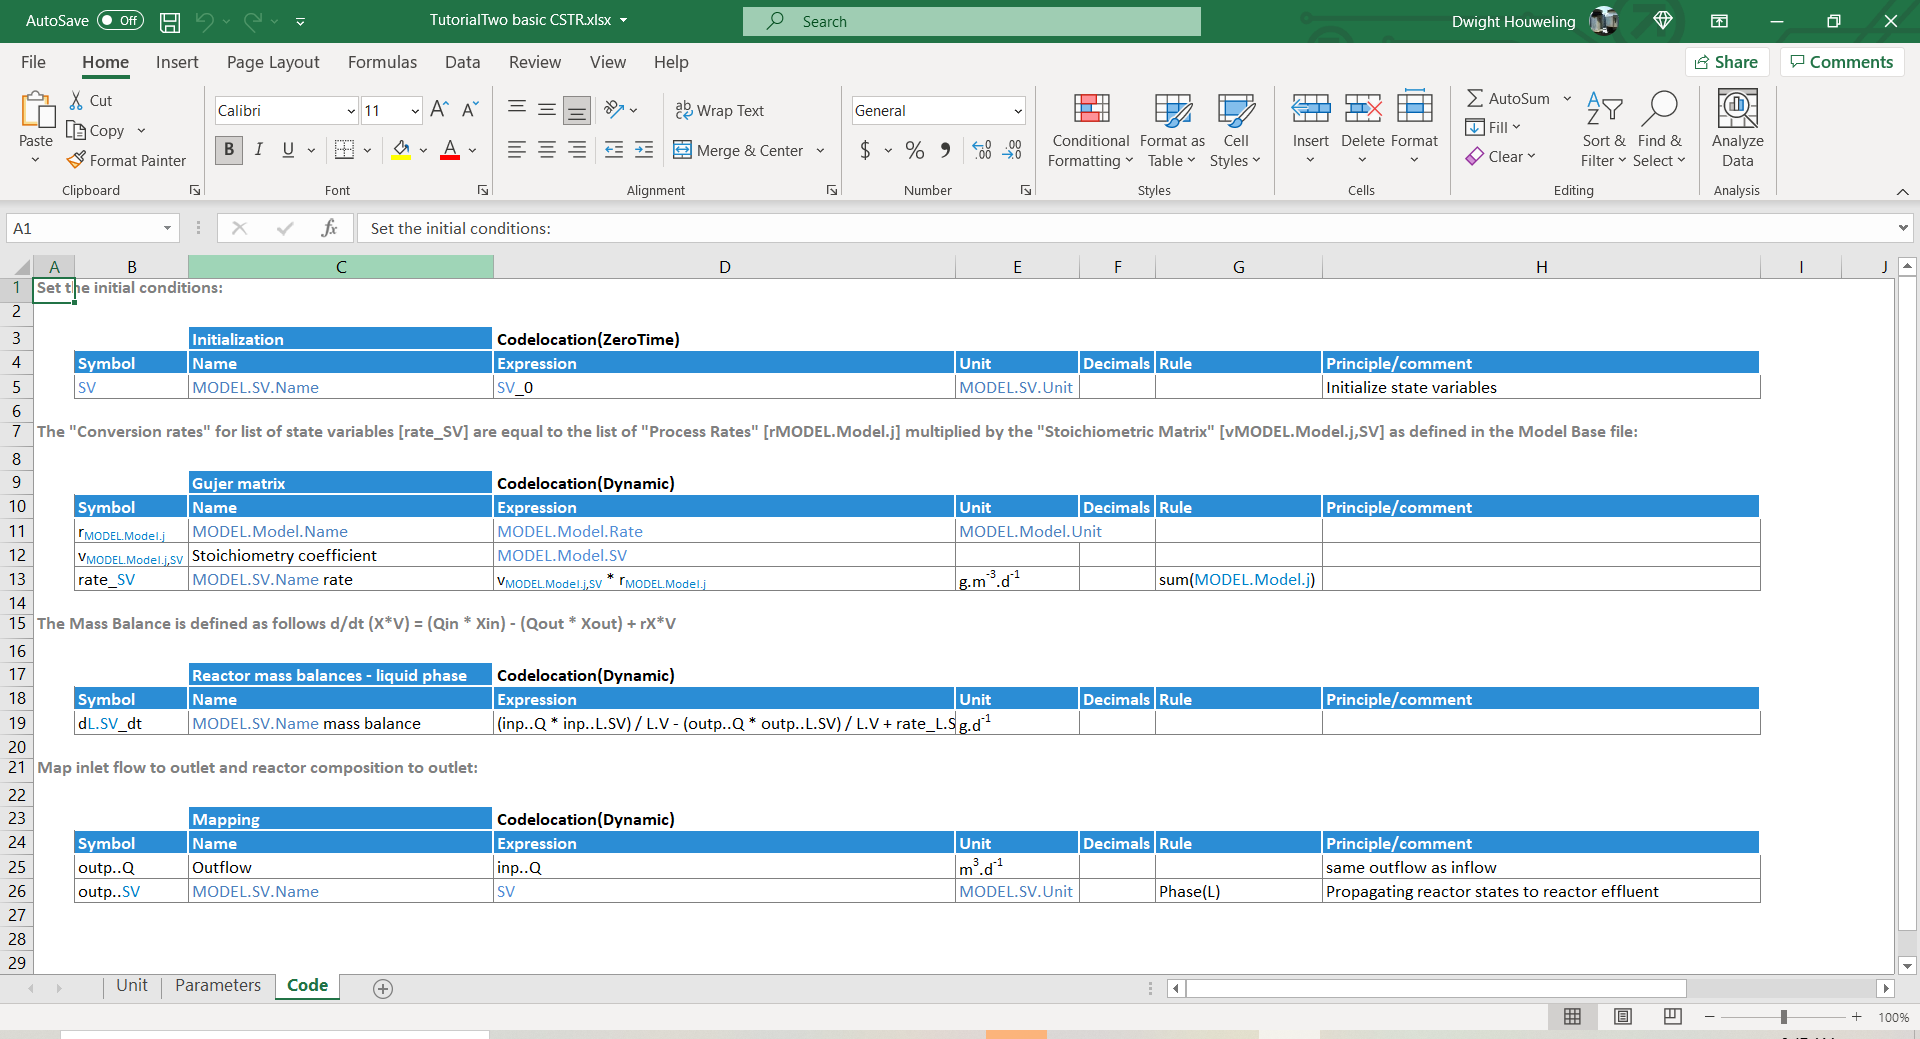
The
Code worksheet is updated to include four tables.
-
The first table in rows 3 to 5 assigns the state variable components
SV in the CSTR compartment to their initial conditions SV_0. Note that the heading to this table cell $D$3 specifies that this assignment is only to be made once, in the Codelocation(ZeroTime). That means initial conditions are assigned only at the very beginning of the simulation.
-
The second table in rows 9 to 13 defines the conversion rates of each of the state variable components
rate_SV as the matrix multiplication of the individual process rates rMODEL.Model.j and the stoichiometric matrix vMODEL.Model.j,SV. rMODEL.Model.j is a reference to the rate expressions of the Model Base following SumoSlang's "triplet notation". More on this notation can be found in the BoSS.[9] For the TutorialTwo_Mini_Sumo.xlsm file we developed, it refers to the expressions defined in cells $AN$4 and $AN$5 of the Model worksheet. Similarly, vMODEL.Model.j,SV is SumoSlang's triplet notation for the stoichiometric matrix described in cells $E$4:$AM$5 of this same worksheet.
-
The third table in rows 17 to 19 uses the conversion rates
rate_SV as part of the mass balance to define the change with respect to time of the concentration of liquid[10] state variables dL.SV_dt. This is the so called differential equation that the SUMO numeric engine will integrate during a model simulation. Note that this mass balance introduces a new parameter L.V to represent the liquid volume of the basic CSTR. We will define L.V in a new worksheet named Parameters. More about the Parameters worksheet below.
-
The fourth table in rows 23 to 26 provides mapping of the influent flow
inp..Q to the reactor effluent outp..Q as well as the concentration of state variables in the reactor compartment SV to the reactor effluent outp..SV.
The four tables are shown below:
-
The
Parameters worksheet is used by SumoSlang to define any user defined parameters or pull them in from the Model Base. In this case we define the liquid volume L.V to 24000 and the initial conditions for the state variables SV_0 to "MODEL.Components.Activated sludge". The expression "MODEL.Components.Activated sludge" refers to the column labelled Activated sludge in the Components worksheet of the Model Base. In our file TutorialTwo_Mini_Sumo.xlsm it is found in column F.

-
The
Unit worksheet does not require any updating.
-
When we open SUMO, we create flowsheet and select "TutorialTwo_Mini_Sumo" from Model Base:
-
After changing the Model Base to "TutorialTwo_Mini_Sumo" we are able to build the model and steady state simulations show an effluent ammonia concentration as follows
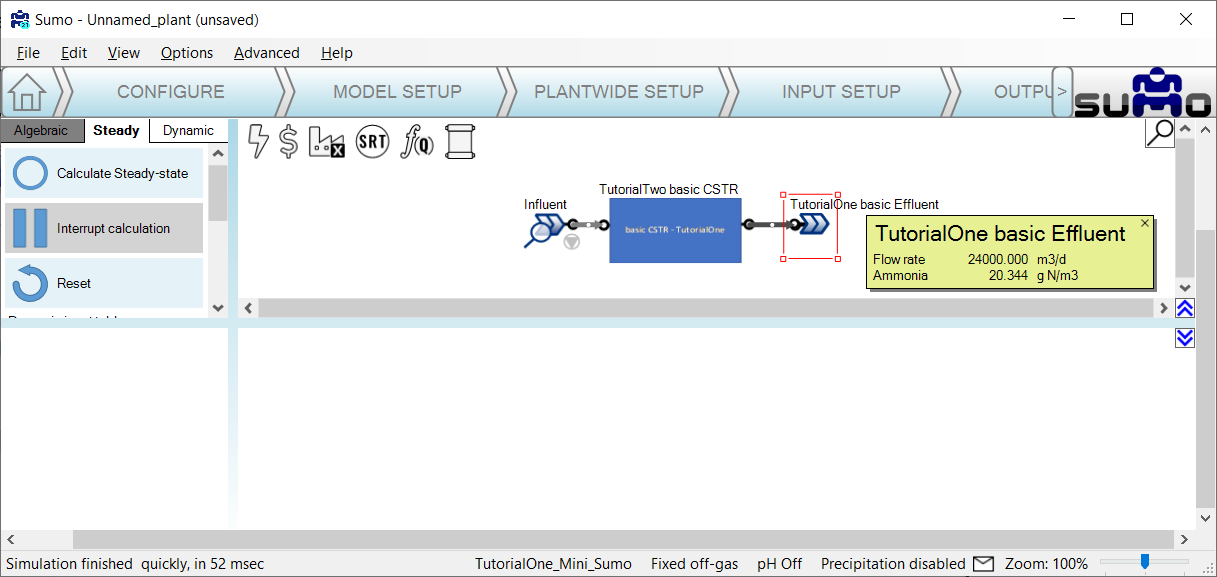
-
The liquid volume
L.V that we defined in the Parameters worksheet of basicTwo CSTR.xlsx can be changed by the user in INPUT SETUP tab. How does the predicted effluent ammonia change if double the reactor volume to 48000 m3?

Summary of Tutorial Two:
Tutorial Two demonstrated how to introduce reactions to our basic CSTR. In technical speak: a mass balance differential equation for the SUMO numeric engine to integrate during simulation runs. Instead of coding reactions directly into the Process Units, we learned how to leverage the Model Base which we pulled into the Process Units using "triplet notation". Unfortunately, the process unit file basicTwo CSTR.xlsx is not compatible with the standard library of SUMO Process Units and Model Base. The reason for this is that it is missing the code to import the Model Base parameters PAR. Also it does not calculate and map certain calculated variables CVAR that other process units expect to be mapped to the ..outp port of our basic CSTR. These shortcomings will be addressed in the remaining two tutorials.
Tutorial Three: Introducing Calculated Variables
The purpose of this tutorial is to make our basic CSTR compatible with the Mini_Sumo from SUMO's standard Model Base.
-
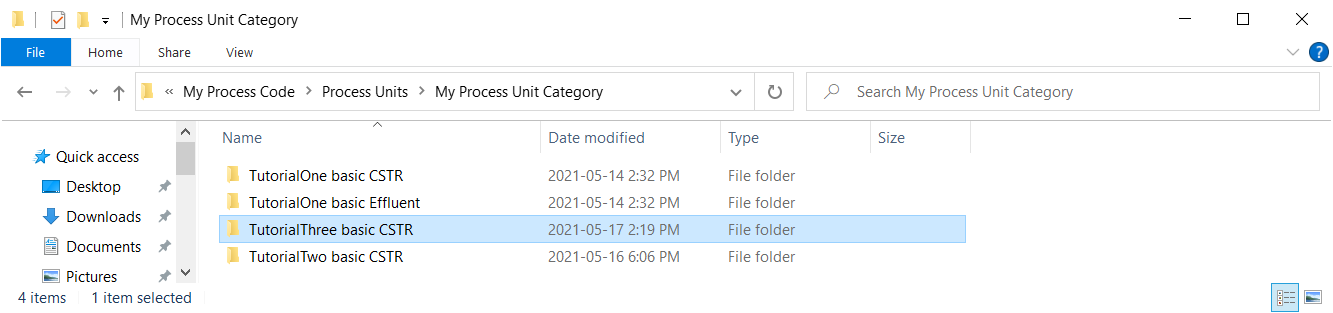
First, let's create a copy of
Tutorial Two basic CSTR inside the My Process Unit Category and call it TutorialThree basic CSTR:
-
Next, we update the file names in
\TutorialThree basic CSTR as follows:

-
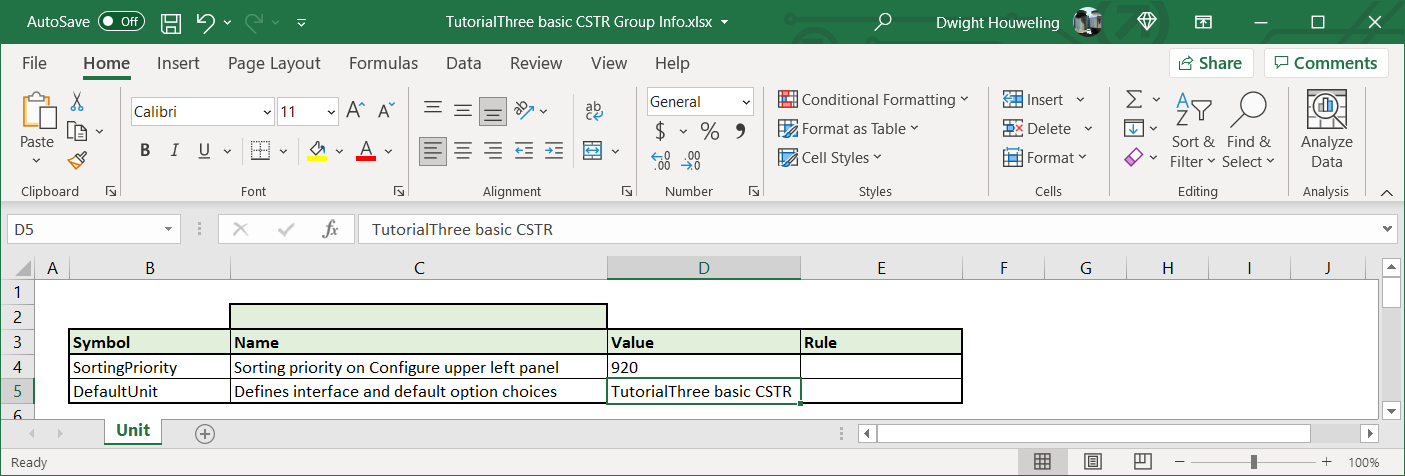
Make sure the
Group Info file references the TutorialThree basic CSTR.xlsx:
-
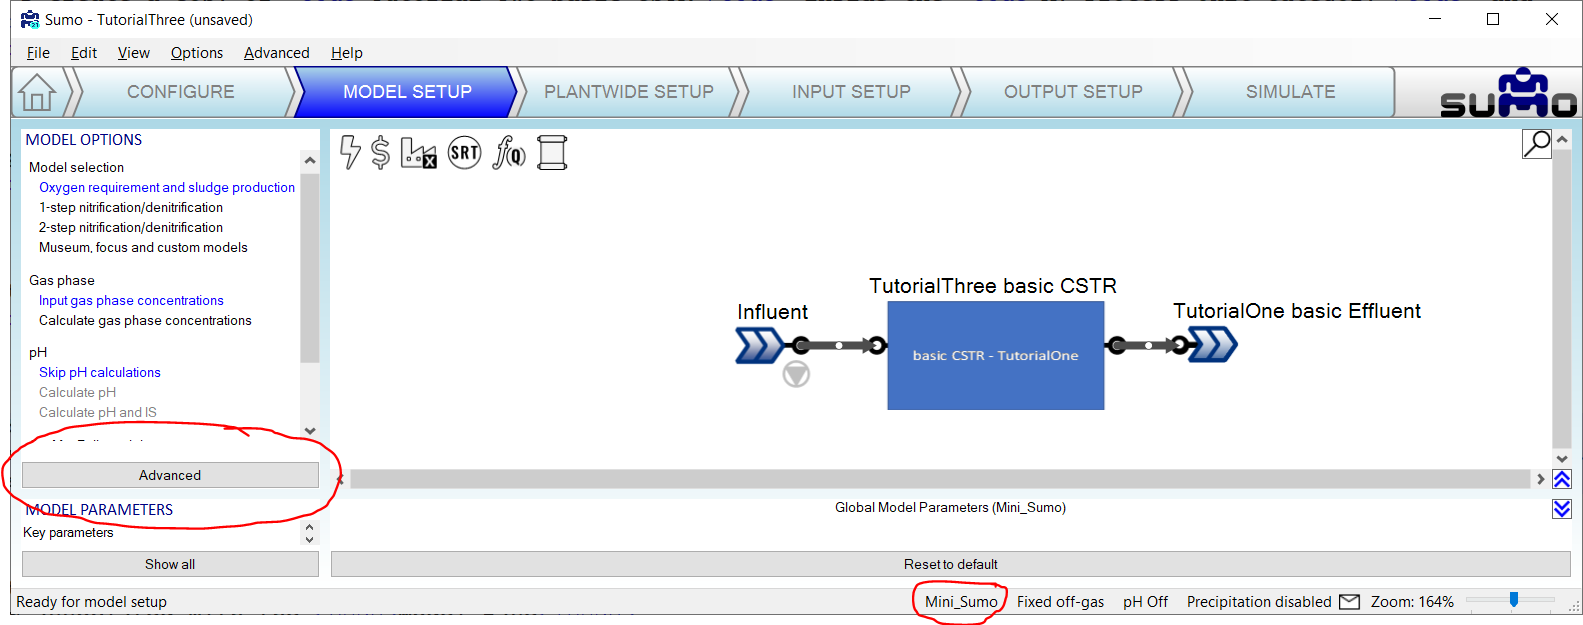
Now let's build a simple model in SUMO using
Influent from the Flow elements and TutorialThree basic CSTR and TutorialOne basic Effluent from the My Process Unit Category. Also, let's select Mini_Sumo from the Advanced option in the MODEL SETUP step. SUMO should then display Mini_Sumo at the bottom of the drawing board window:
-
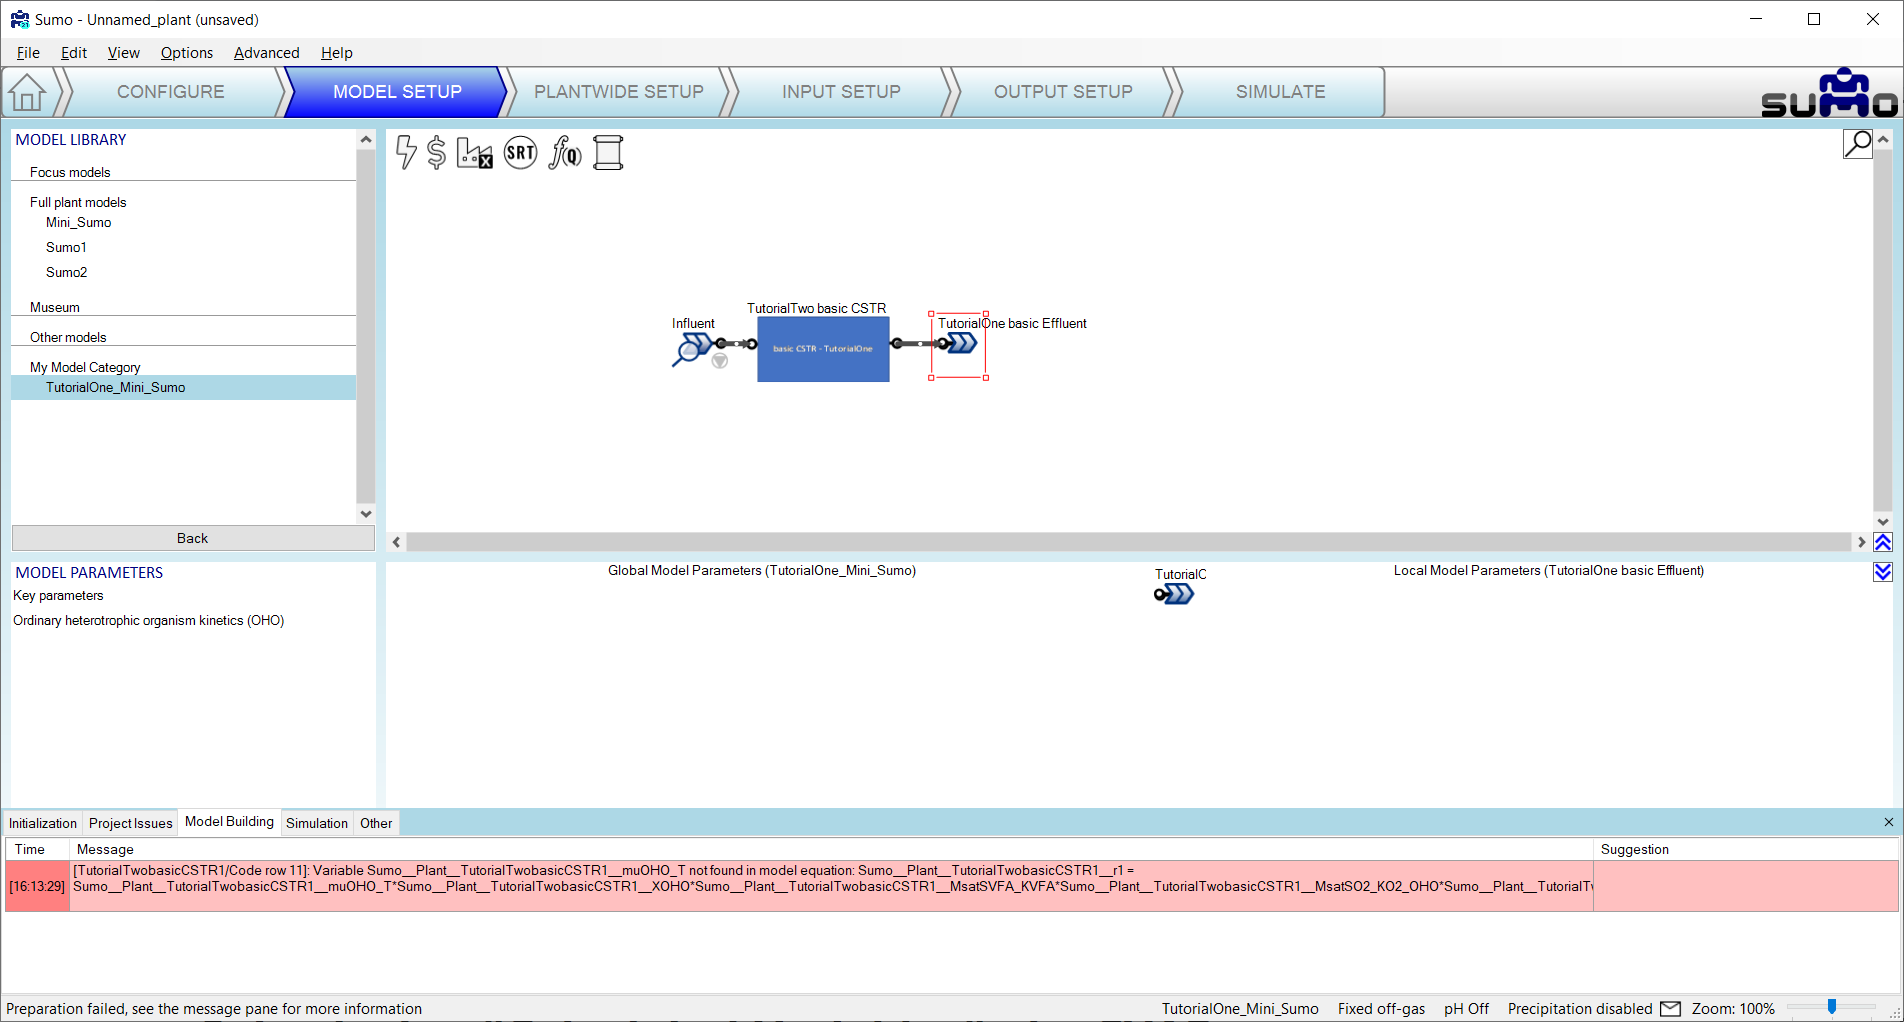
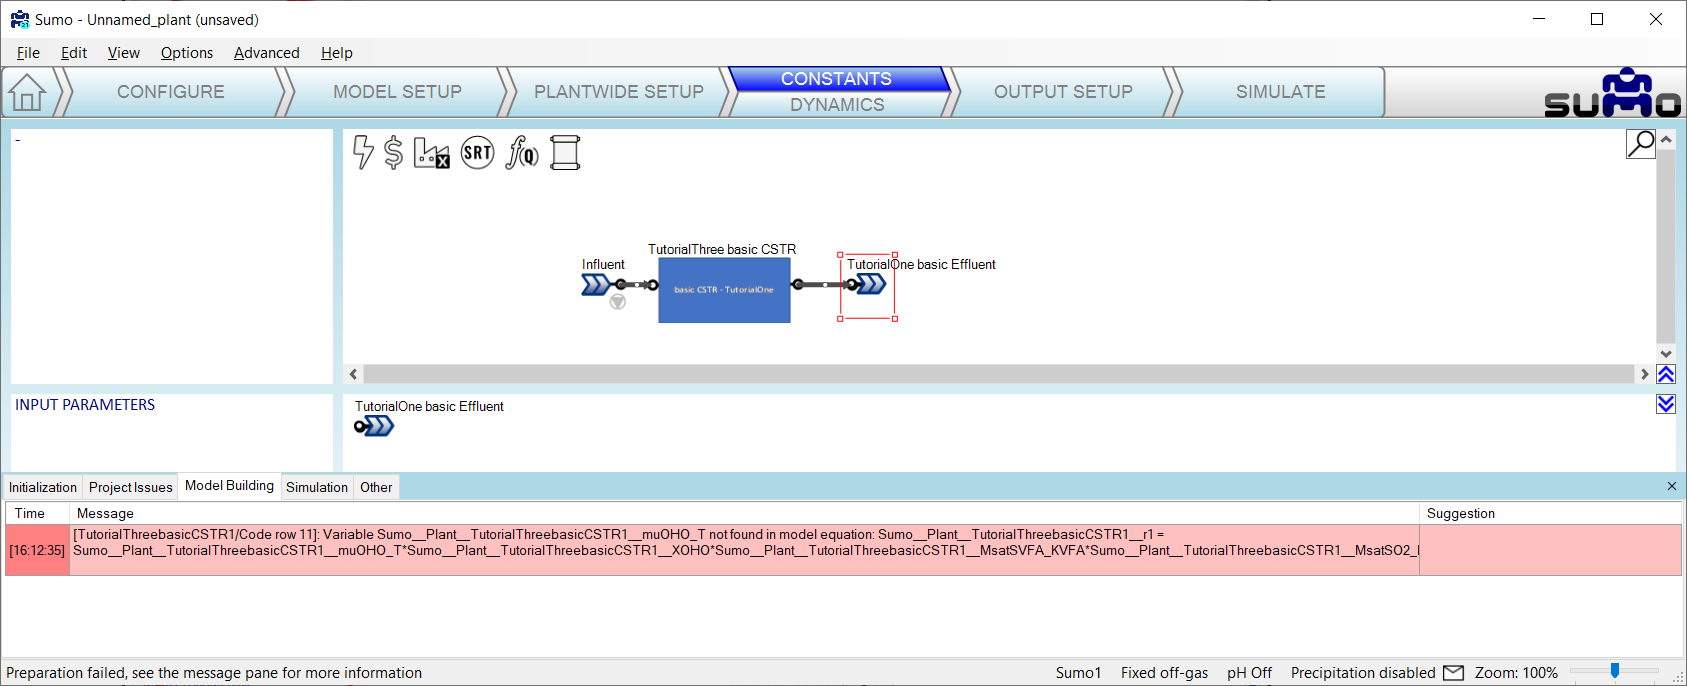
When we attempt to build the model we get the error highlighted below that SUMO cannot find
muOHO_T. This is a parameter associated with the Model Base.
-
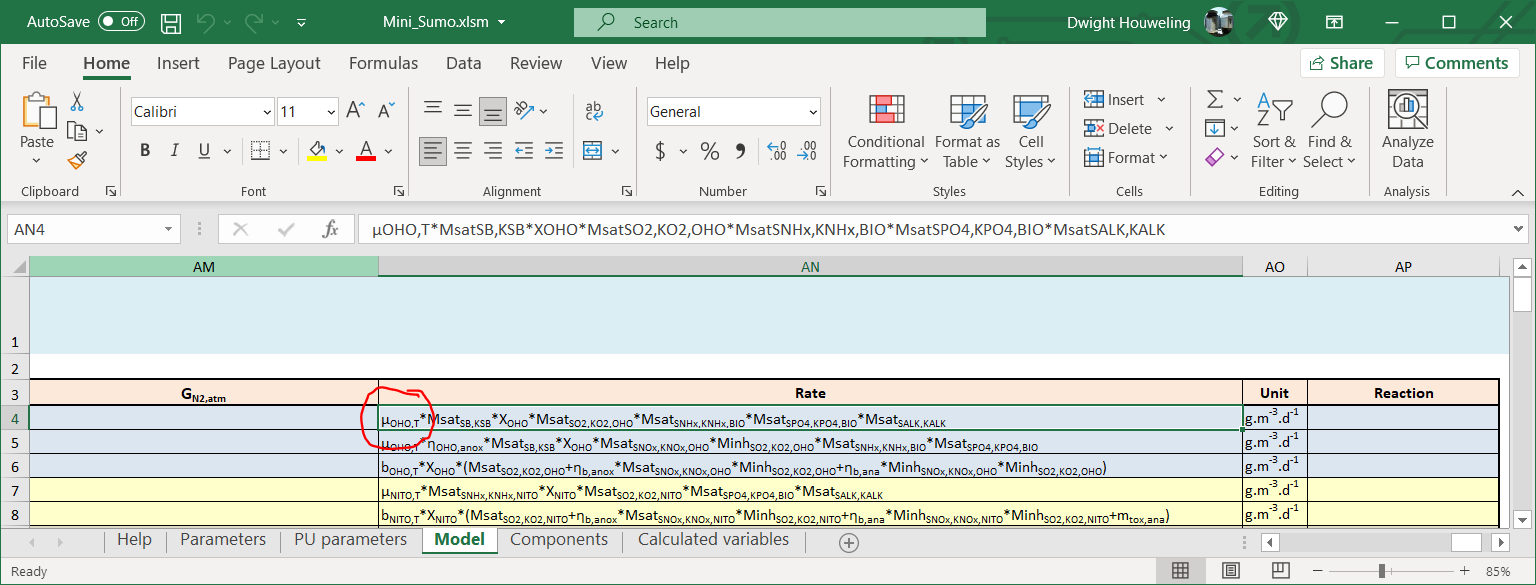
When we search
Mini_Sumo.xlsx[11] for this muOHO_T, we find that it is used in the very first process rate equation of the Model worksheet. In addition, a search throughout this file CTRL+F reveals that it is calculated in the Calculated variables worksheet based on parameters like muOHO and Tbase which are defined in the Parameters worksheet. Notice how Greek letters in Excel are translated into their latin equivalent in SUMO and commas are replaced with underscores. So what is referred to as muOHO_T in SUMO is actually μOHO,T in the Excel file.
-
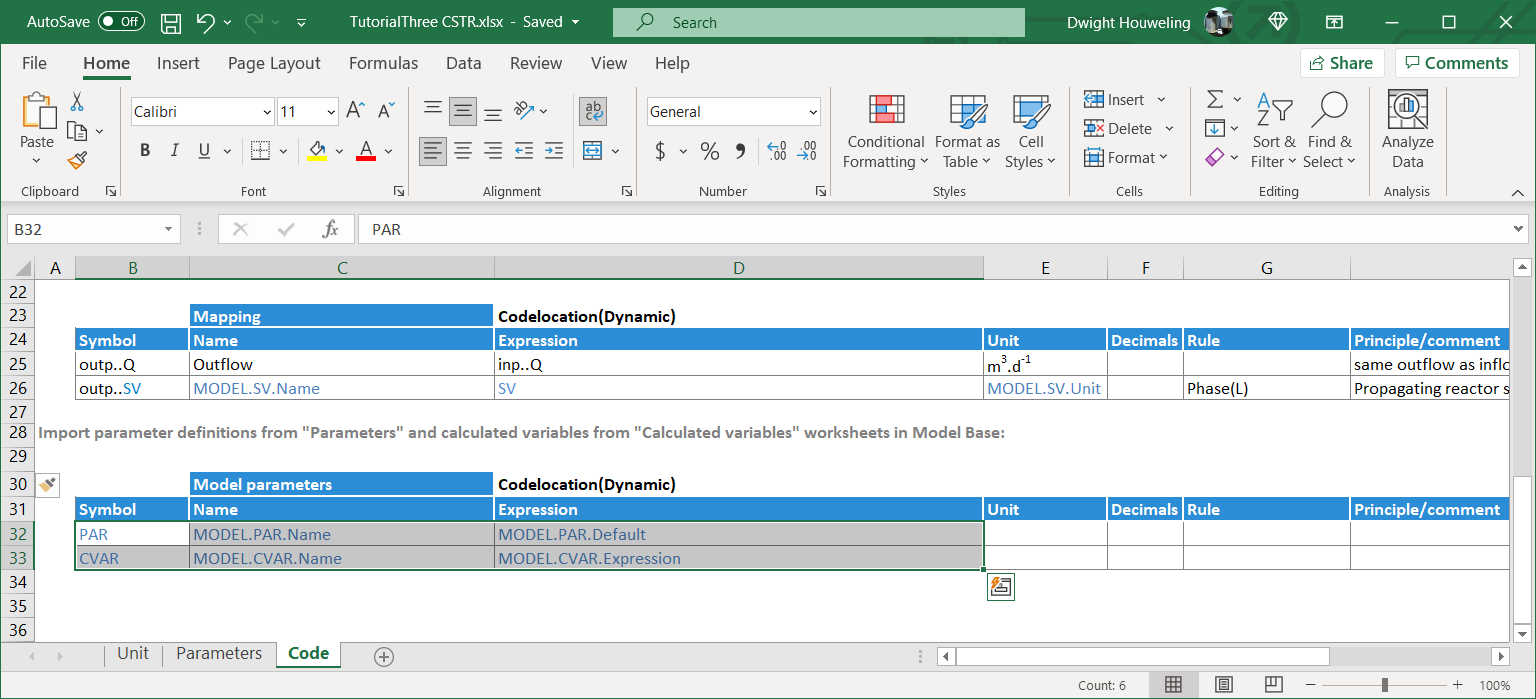
To correct this error, we will import the parameters
PAR and calculated variables CVAR from the Model Base using the following two lines in TutorialThree basic CSTR.xlsxMini_Sumo.xlsx[12]:
-
Now, we reopen SUMO and when we try to build our simple flowsheet, the error related to
muOHO_T no longer appears. But instead we have a new error related to kLaGCH4_bub. After searching the Mini_Sumo.xlsx we find it in the Methane gas transfer - bubbles rate in the Model worksheet. Interestingly, it does not appear in the Parameters or Calculated variables worksheets. Actually, SumoSlang is looking for this to be calculated directly in the process unit file. For example in the standard library CSTR process units[13], this parameter would be calculated in Code worksheet as kLaG.SV,bub where G.SV is expanded by SumoSlang to include all gas phase state variables including CH4.
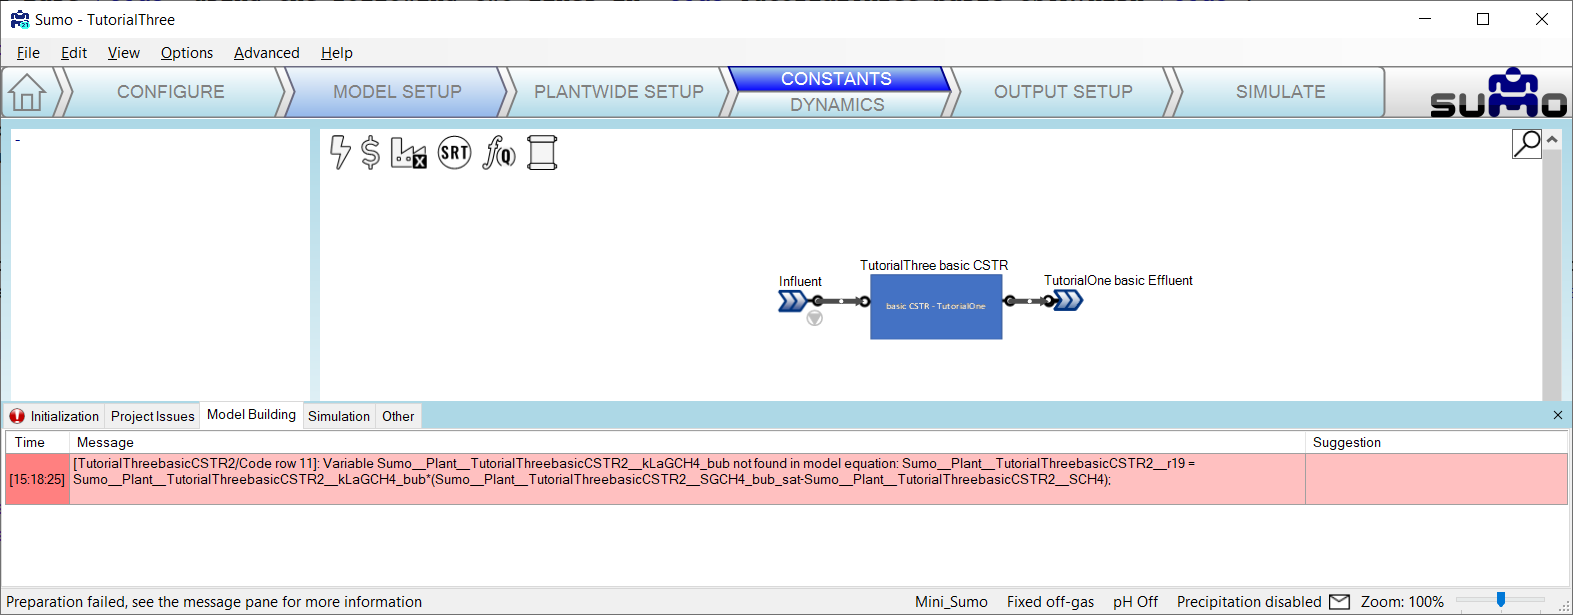
-
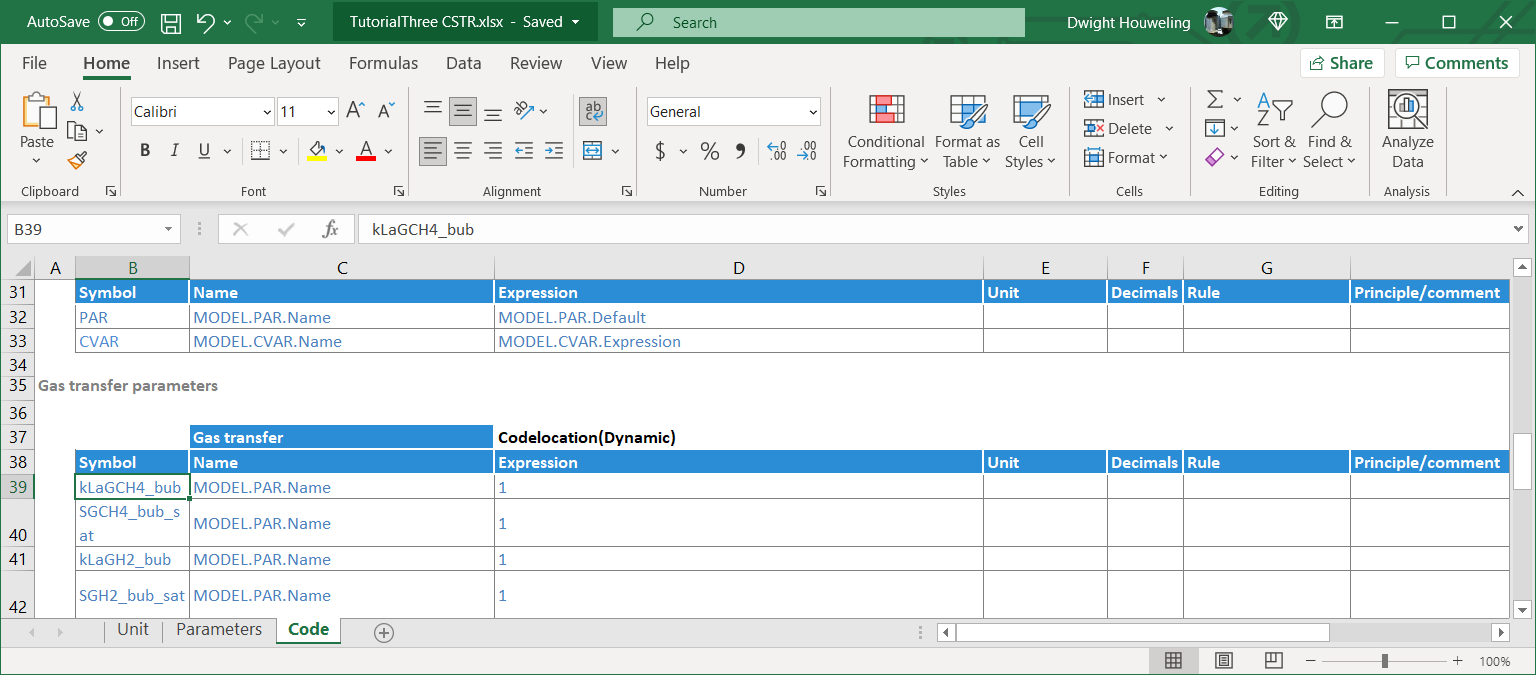
So we will provide SUMO with the gas transfer parameters it is looking for by coding them into the
Code worksheet and assigning them placeholder values of 1.
-
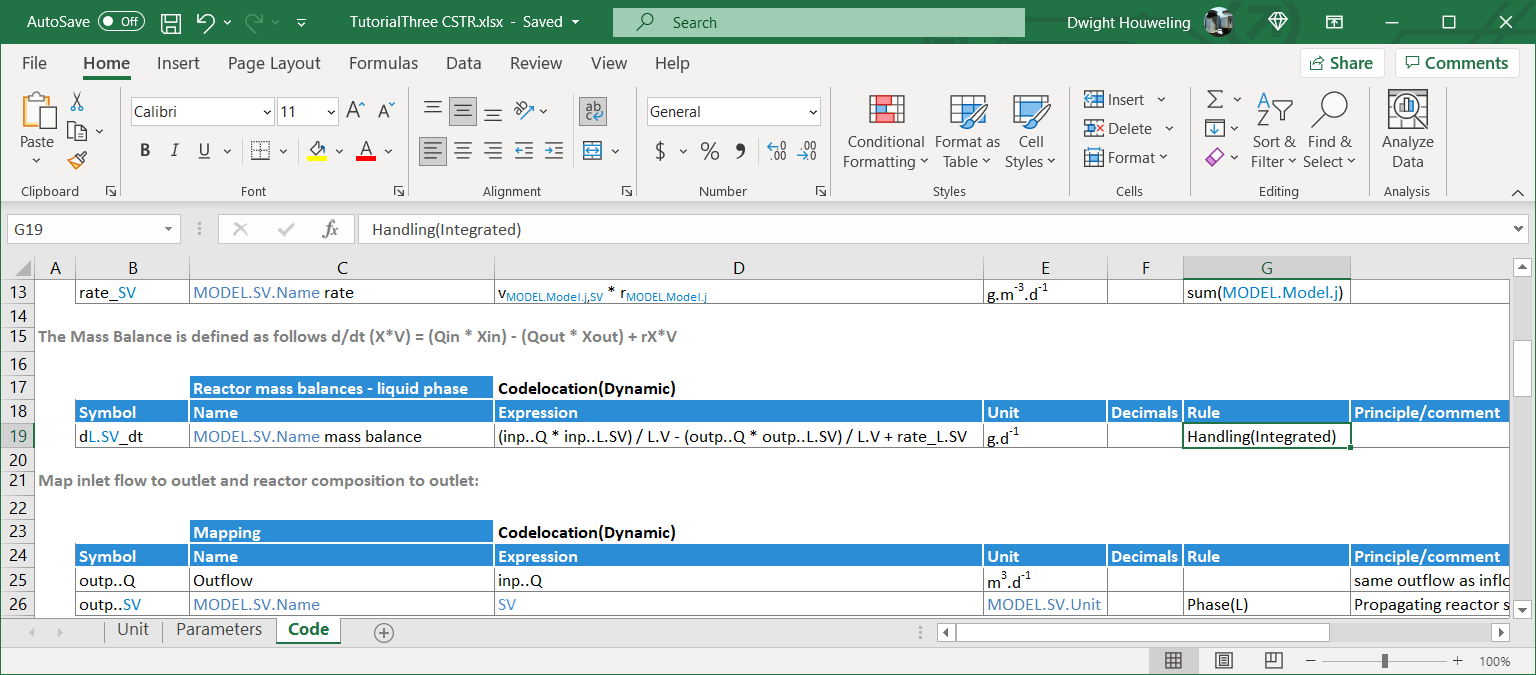
But in fact, we don't want SUMO to calculate gas transfer rates since we have only have placeholder values for the gas transfer
kLa coefficients. SumoSlang provides a nice way to handle this by adding a Rule to the calculation of mass balance. This Rule specifies that the mass balance will only be calculated for state variables SV which have been identified in Model Base to have Handling(Integrated). The handling of each of the state variables is identified in the Components worksheet table heading Handling. For Mini_Sumo.xlsx you will find that most state variables are Integrated but gases are Set.
-
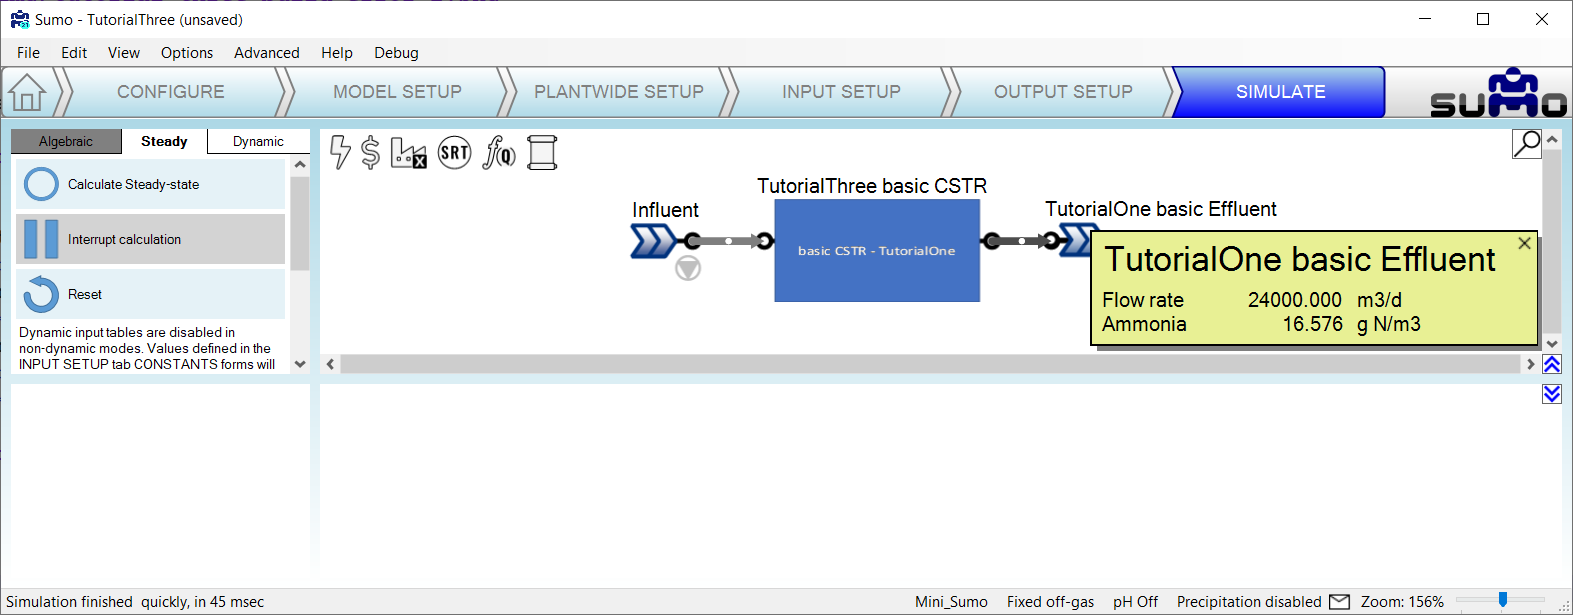
Once again we reopen SUMO and try to build our basic CSTR model. And this time there are no errors. Success!
Summary of Tutorial Three:
Tutorial Three demonstrated how to import parameters PAR and calculated variables CVAR from the Model Base. In addition, the reliance of the SUMO standard model library on calculation of gas transfer kLa coefficients in the Process Code was demonstrated. The updates to the basic CSTR process unit code in this tutorial makes it compatible with the standard SUMO Model Base. However, there is still one more step required to make it compatible with the standard SUMO Process Units. This final change is demonstrated in Tutorial Four.
Tutorial Four: Compatibility with the SUMO Process Unit Library
-
Make a copy of the
TutorialThree basic CSTR folder and rename it TutorialFour basic CSTR. Update the names of the files in this folder to make it consistent with the folder name and also remember to change the name of the process unit file referenced inside the Group Info file.
-
Double check that you can successfully build and simulate a model using the
Mini_Sumo model as described in Tutorial Three but using the TutorialFour basic CSTR.
-
Next we will delete the
TutorialOne basic Effluent and replace it with the Effluent element from the standard SUMO Flow elements. When we try to build this model we get the following error:
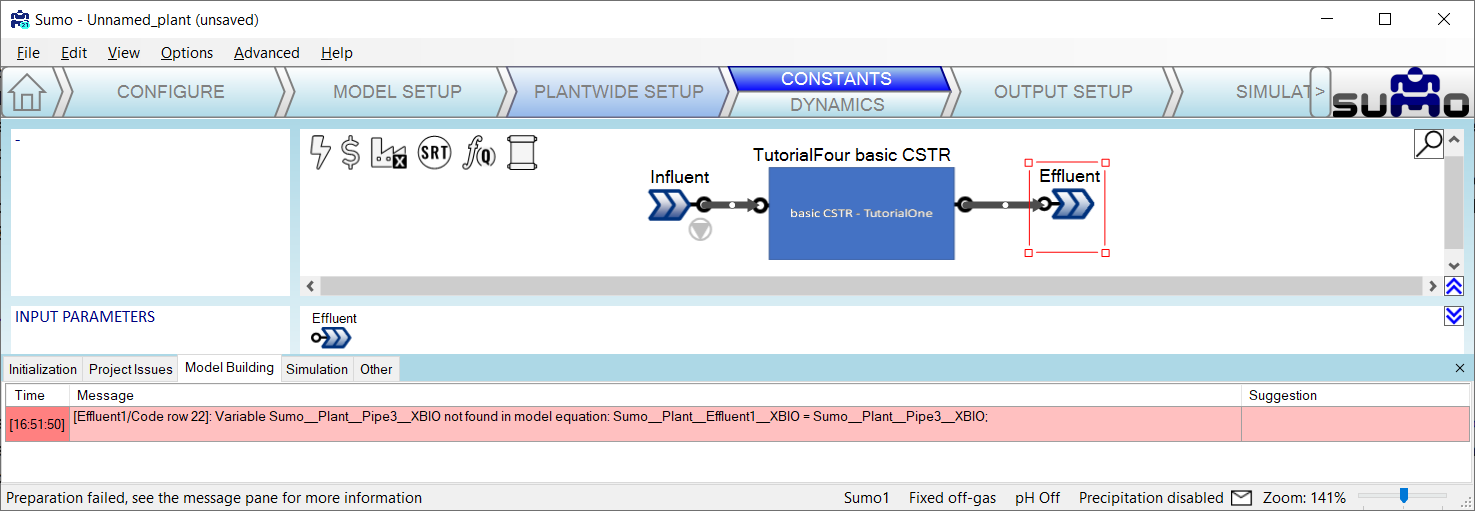
-
In short, SUMO is looking to assign
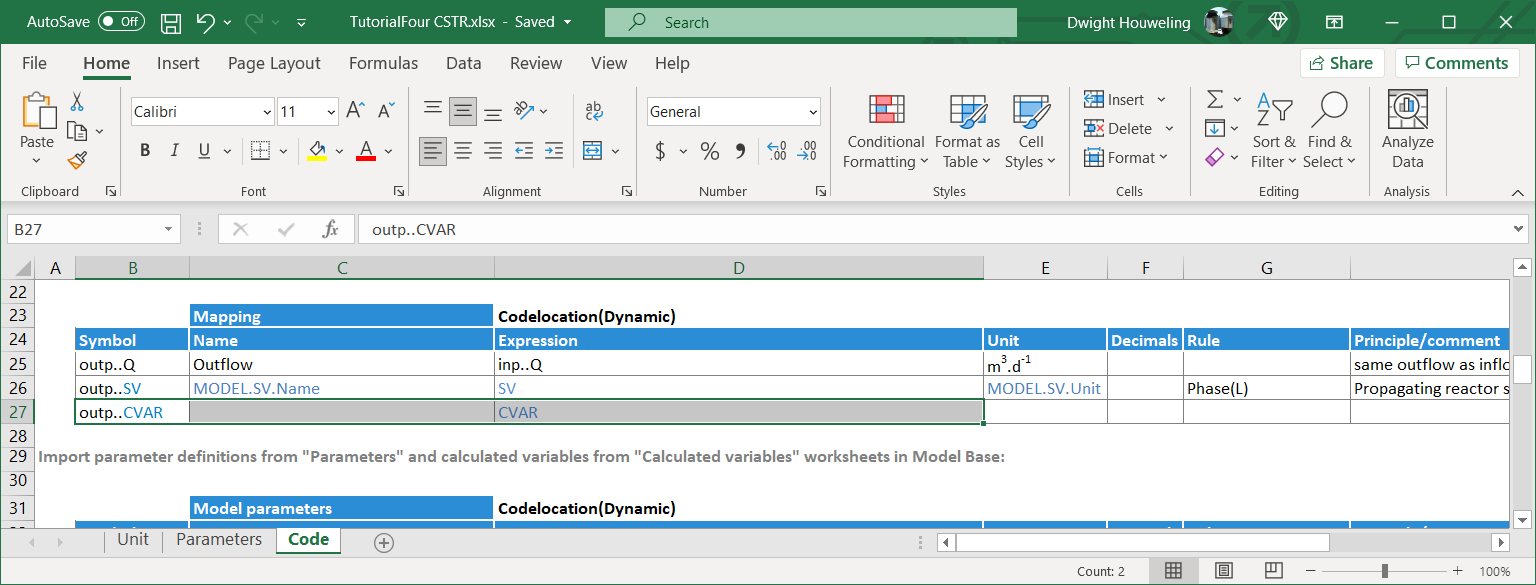
XBIO in the Effluent to the value in the effluent of the basic CSTR. A review of the Model Base indicates that XBIO is a calculated variable CVAR and so we conclude that our code is not mapping CVAR to the ..outp of the reactor. We can add the following line to the Code worksheet of TutorialFour basic CSTR.xlsx to rectify this:
-
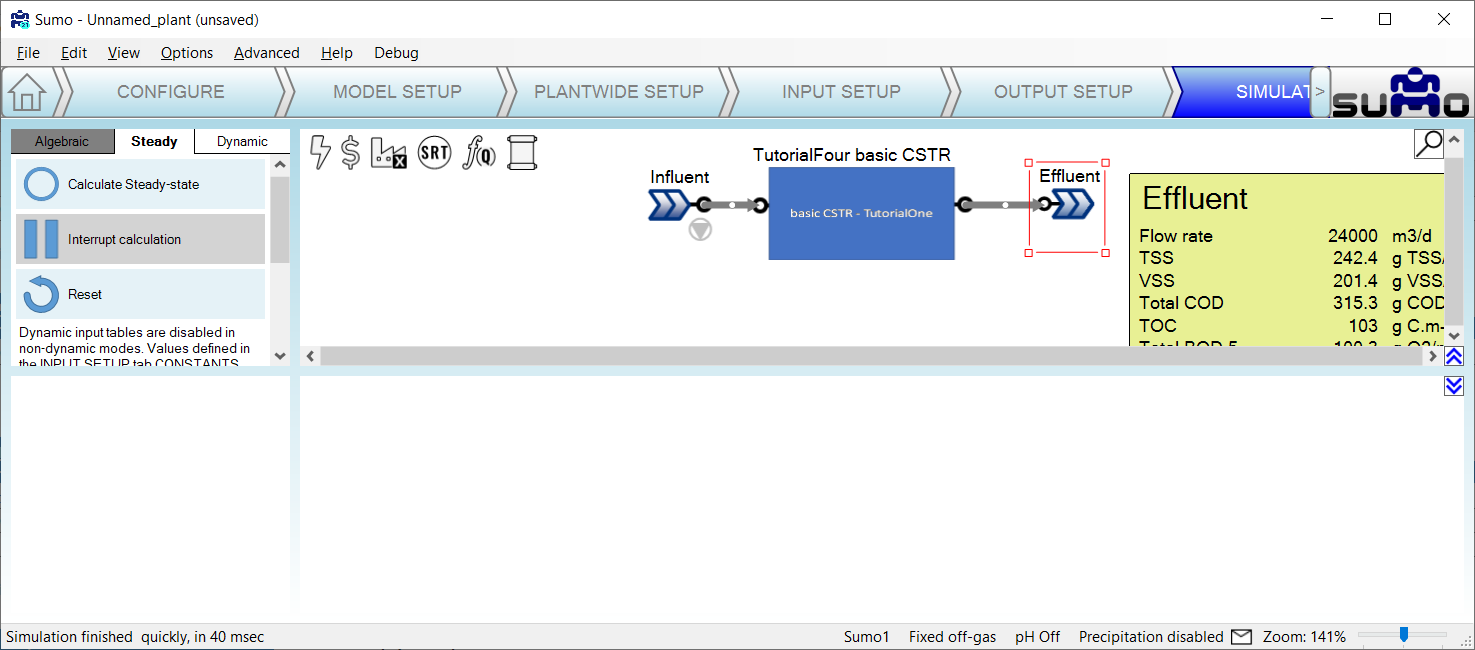
We reopen SUMO and try to build the model with the standard library
Effluent element. Success! And when we mouseover the Effluent element we see the calculated variables from the Model Base displayed on the screen:
Summary of Tutorial Four:
Tutorial Four demonstrated how to map CVAR to the effluent of our basic CSTR process unit. This is important because it makes our process unit compatible with the standard library of SUMO process units. Many of these process units are very simple like splitter and mixer element that do need to not interface with the Model Base. They therefore rely on the mapping of both SV and CVAR from upstream process units. Based on these four tutorials you have the fundamental tools to build custom process unit models that can leverage the Model Base and interface with the rest of the SUMO standard library of Process Units. So have fun! For further tips on style I suggest the BoSS as well as studying some of the standard library Process Units.
Next steps:
The previous tutorials provided an overview of how to get started building customized process models in SumoSlang. What are some good next steps? How about the following:
-
Think about a unique process that you want to develop a customized model for. For example, maybe one where inlet flow is split evenly between two outlet streams but particulate
SV are preferentially directed to one outlet at the expense of the other. Looking at how this is coded for a hydrocyclone in the standard SUMO library C:\Dynamita\Sumo21\Process code\Process units\Separators\Cyclone might be a good place before getting started with your own customized version.
-
Explore the use of "complex" models as a powerful way to further use SumoSlang to build process unit models from other process unit models. As an example, the standard SUMO library model for a pond
\Dynamita\Sumo21\Process code\Process units\Bioreactors\Pond uses the code for an equalization basin \Dynamita\Sumo21\Process code\Process units\Flow elements\Equalization basin to model the interaction between a pond water column and its sediment layer. Note how the Pond model includes an additional worksheet named Structure which invokes several process units from the standard library including the Variable volume equalization basin.
-
Explore the use of "array" notation to specify multiple compartments within a single process unit. A good example of the use of array notation is provided in the plug flow bioreactor
\Dynamita\Sumo21\Process code\Process units\Bioreactors\PFR.
Footnotes:
[0] SumoSlang can be a little intimidating to the uninitiated, even for an experienced modeller. These tutorials are written for you if you are already familiar with how process models work, the Gujer matrix, systems of differential equations, maybe you have even done some coding on your own, but nothing as a sophisticated as what's "under the hood" of a commercial simulation software package like SUMO. Imagine Orville Wright transported in time into the cockpit of a 747. Arguably he would know as much as anyone about airplanes and how to fly them. But in a 747 cockpit there are so many buttons, so many little lights, he would have no idea what does what! No question of "learning by doing". Common sense dictates he should not touch anything without supervision and hours of training. You think this example too dramatic? After all, no one ever died crashing their computer. True, but the fact is that it is easier to learn when complexity is stripped away. And this is just as true for modelling as it is for learning to fly an airplane. After all if Orville Wright had been forced to learn to fly in a Boeing 747, then the history of aviation might have turned out very differently.
[1] The BoSS aka Book of SumoSlang
[2] When do we need to code SumoSlang? Can't we create models directly in SUMO? In fact, for most cases, creating models doesn't require any coding at all. A novel BNR process may be unique and different from any other BNR process in the world, but it is still just a combination of aerated and unaerated bioreactors. So no need for SumoSlang, just drag and drop bioreactor elements into the SUMO drawing board and away you go, happy modelling! But suppose the model involves a hybrid reactor with unique interactions between suspended and attached growth, maybe even something interesting happening with the gas phase too. And perhaps there is no process unit in the standard SUMO library that adequately captures the unique behavior in this reactor. This is a more complex case and in most commercial software you would be stuck. But in SUMO it's not a problem because you can just code it yourself.... in SumoSlang!
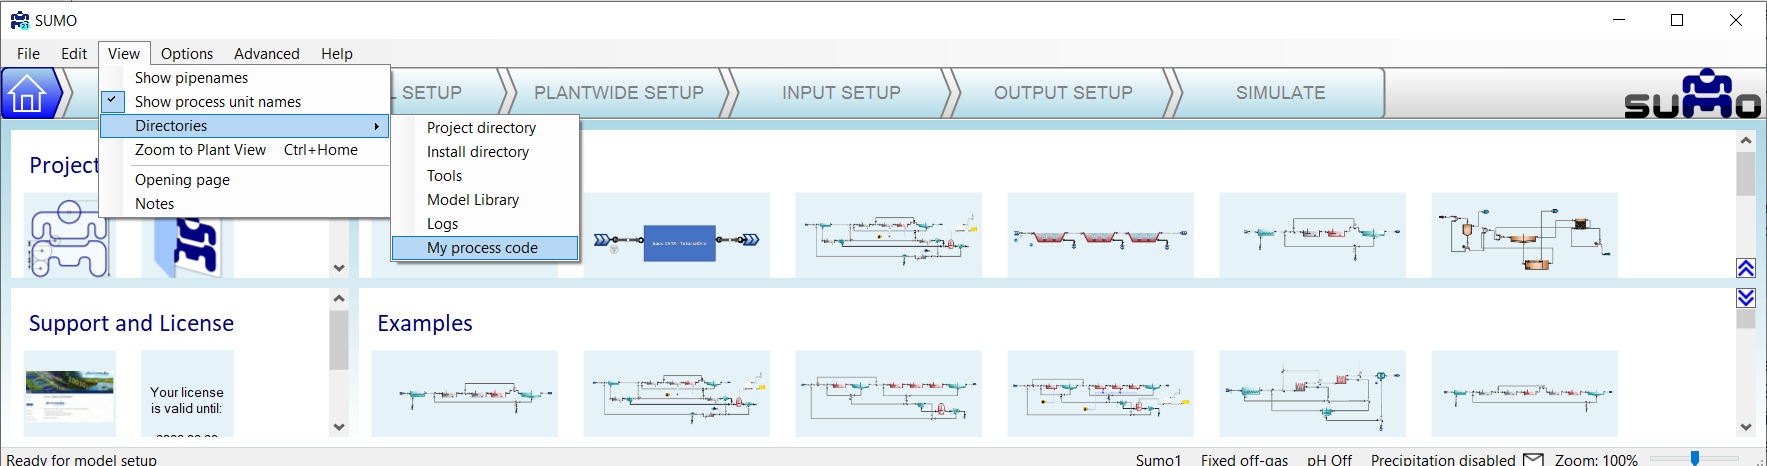
[3] Note that if you find a directory named "Process Code" but not "My Process Code" then you chose separate locations for the "Install" and "Working" directories on installation of SUMO. Another way to find the location of "My Process Code" is from the main menu of the SUMO "View | Directories | My process code".
[4] The names of these files is important. First, it is critical that the "Group Info" file include the same name as the folder in which it is found. For example, if the folder name is "Industrial DAF" then the "Group Info" file would need to be "Industrial DAF Group Info.xlsx". Or, since in this case the folder name is "TutorialOne basic CSTR" then the file name is "TutorialOne basic CSTR Group Info.xlsx". There are no constraints on the image file and other ".xlsx" files names other than no special characters, that includes hyphens! The names of the image file(s) will be referenced in the process unit excel file(s) and in a similar manner the names of the process unit excel file(s) will be referenced in the Group Info file. I use "(s)" in "file(s)" to indicate that there can be one or several of these. There can, however, be only one "Group Info" file.
[5] You might ask "Which state variables?" "I haven't defined any state variables yet!" The state variables refer will be the ones associated with the Model Base file that is activated in the SUMO flowsheet. When you open SUMO, the default Model Base is the Sumo1 model. This model includes some X state variables and so inp..L.SV and outp..L.SV refer to the entire list of liquid state variables associated with the input and output streams to our process unit, the basic CSTR. If you were to change the Model Base file to something different, Sumo2 or maybe your own custom Model Base, then L.SV would refer to state variables in that Model Base file.
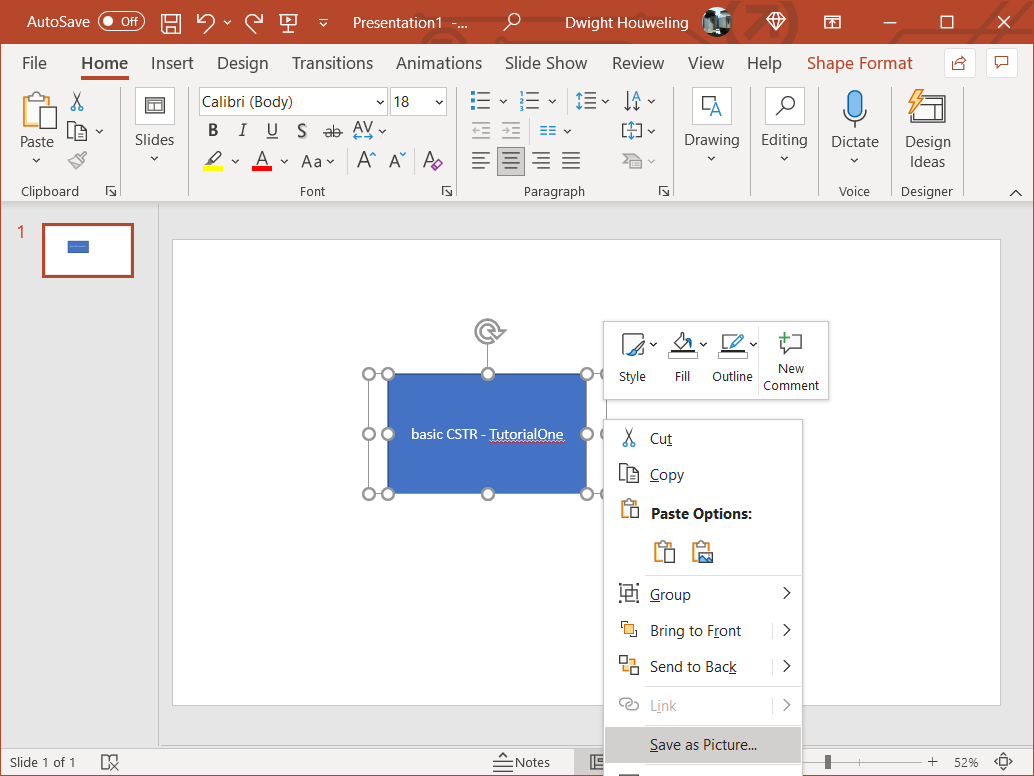
[6] What is the best way to create images for the drawing board? In this case I have used Powerpoint to create a rectangle with some text inside it. Then I select the image, right click and select "Save as Picture" from the drop down menu. In order to create some space in the image for the ports to appear, create a second rectangle behind the blue one. The second rectangle should have no fill and no outline. But it will define the boundaries of the image file slightly larger than the blue rectangle. This will create space for the ports to appear.
[7] The purpose of deparametizing the model in Tutorial Two is so that we do not need to include code to import the Model Base "parameters" or "PARAM" in basic CSTR.xlsx. There are different ways to import "parameters" from the Model Base into the Process Units code and so it is preferable to treat this in a separate tutorial.
[8] The stoichiometry of the growth of nitrifiers is presented at its simplest here. The utilization of 1 g NH4-N generates Y g of nitrifying organisms XNITO. Therefore to generate 1 g of XNITO we require 1/Y g of NH4-N. Assuming Y=0.15 explains the hardcoded values of -6.667 and +6.667 for ammonia and nitrate, respectively.
[9] Don't forget to check out the BoSS aka Book of SumoSlang!
[10] SumoSlang allows you to identify and perform calculations on the liquid state variables L.SV separately from the longer list of all state variables SV which also includes gaseous components G.SV associated with bubbles and head space. This is a useful distinction because L.SV travel from reactor to reactor whereas G.SV do not. How does SumoSlang know whether SV is an L.SV? SumoSlang looks for these definitions in in the Phase column of the Components worksheet of the Model Base. Take a look in our TutorialTwo_Mini_Sumo.xlsm or any other of the files in the SUMO Model Base.
[11] On my computer this file is located in C:\Users\cdhou\AppData\Local\Dynamita\Sumo21\Process code\Model base\Full plant models.
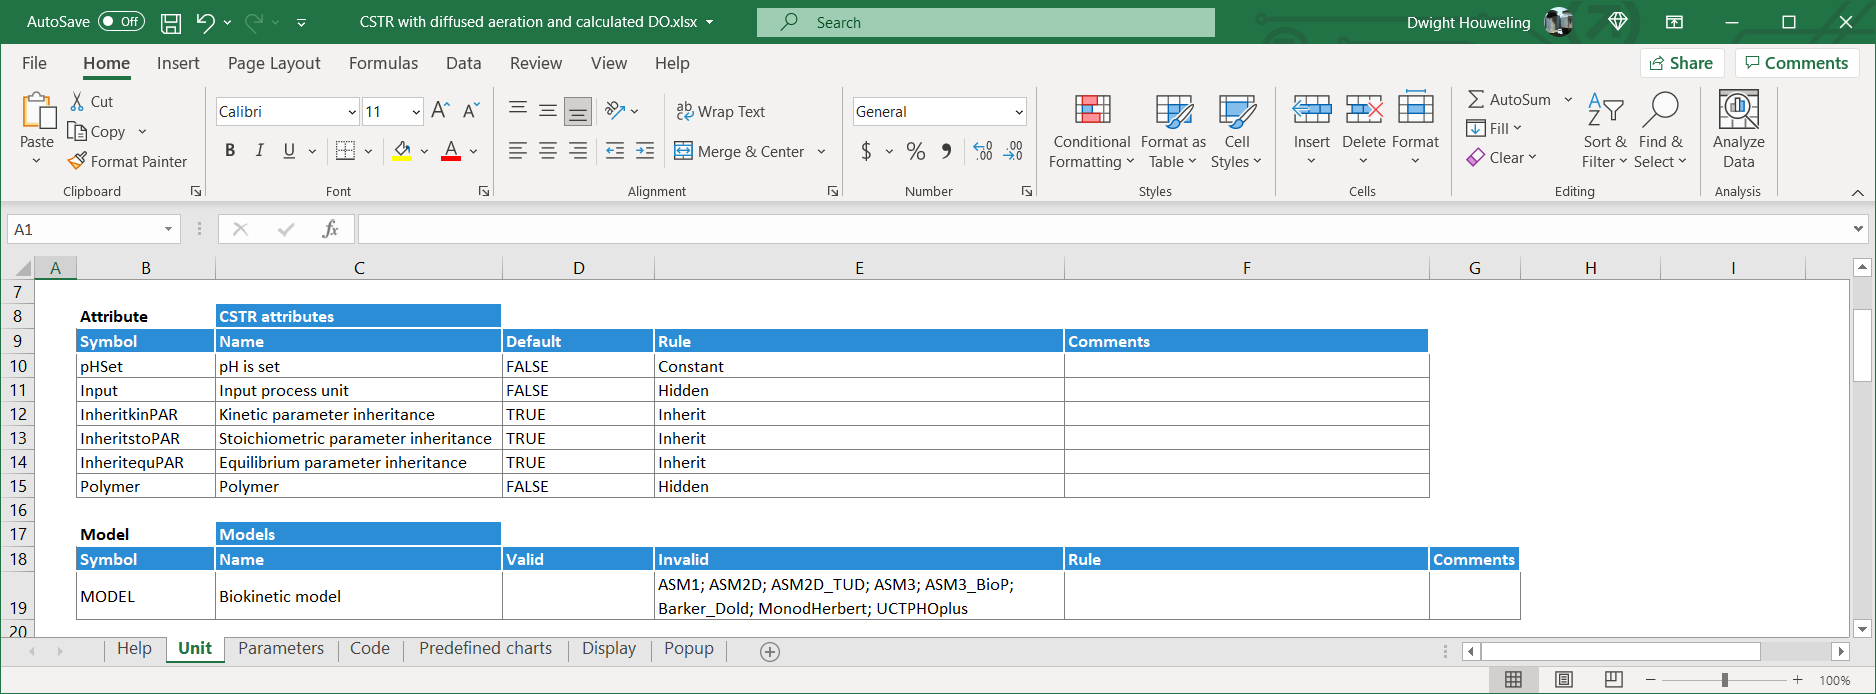
[12] On inspecting coding of CSTR with diffused aeration and calculated DO.xlsx from the standard SUMO process unit library we find PAR defined three times in the Parameters worksheet and then another three times in the Code worksheet. What's going on? Do understand this we need to look at the Rule column. First, in the both worksheets, the three definitions of PAR apply, respectively, to Type(Kinetic), Type(Stoichiometric) and Type(Equilibrium). So the first thing to understand about these definitions is that they import parameters from the Model Base depending on whether the table heading in the Parameters worksheet includes Type(Kinetic), Type(Stoichiometric) or Type(Equilibrium). Secondly, in the Parameters worksheet these definitions are only applied if Non-InheritkinPAR, Non-InheritstoPAR and Non-InheritequPAR.
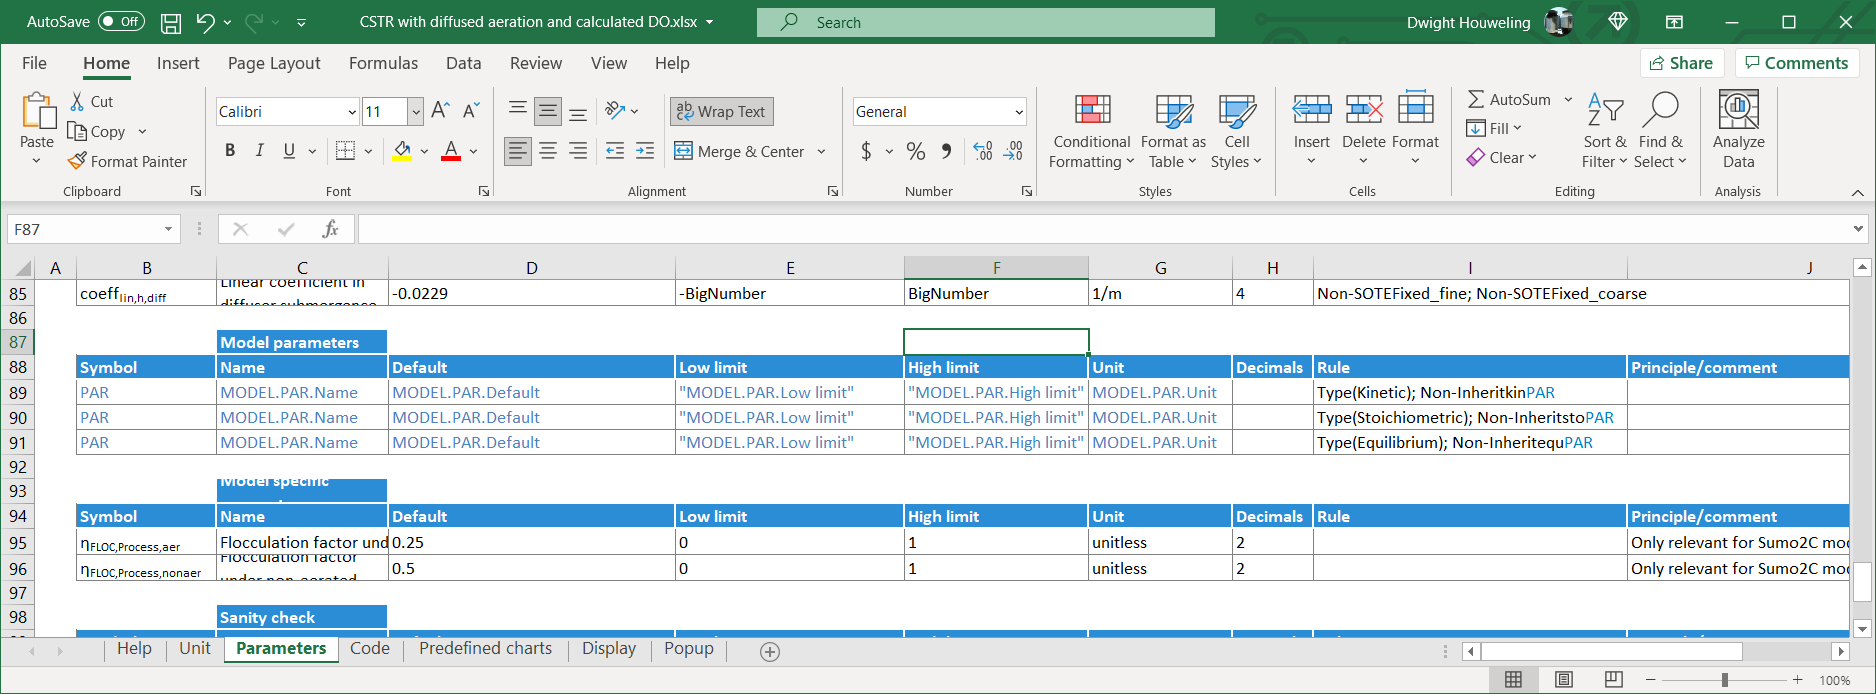
In contrast, in the Code worksheet, the rules are opposite: InheritkinPAR, InheritstoPAR and InheritequPAR. Which will prevail? The answer lies in the definitions for these inheritances which are found in the Unit worksheet. Since these inheritance parameters are assigned to TRUE, only the definitions of PAR from the Code worksheet apply.
And PAR is defined in the Code in terms of the parent unit Parent..PAR:
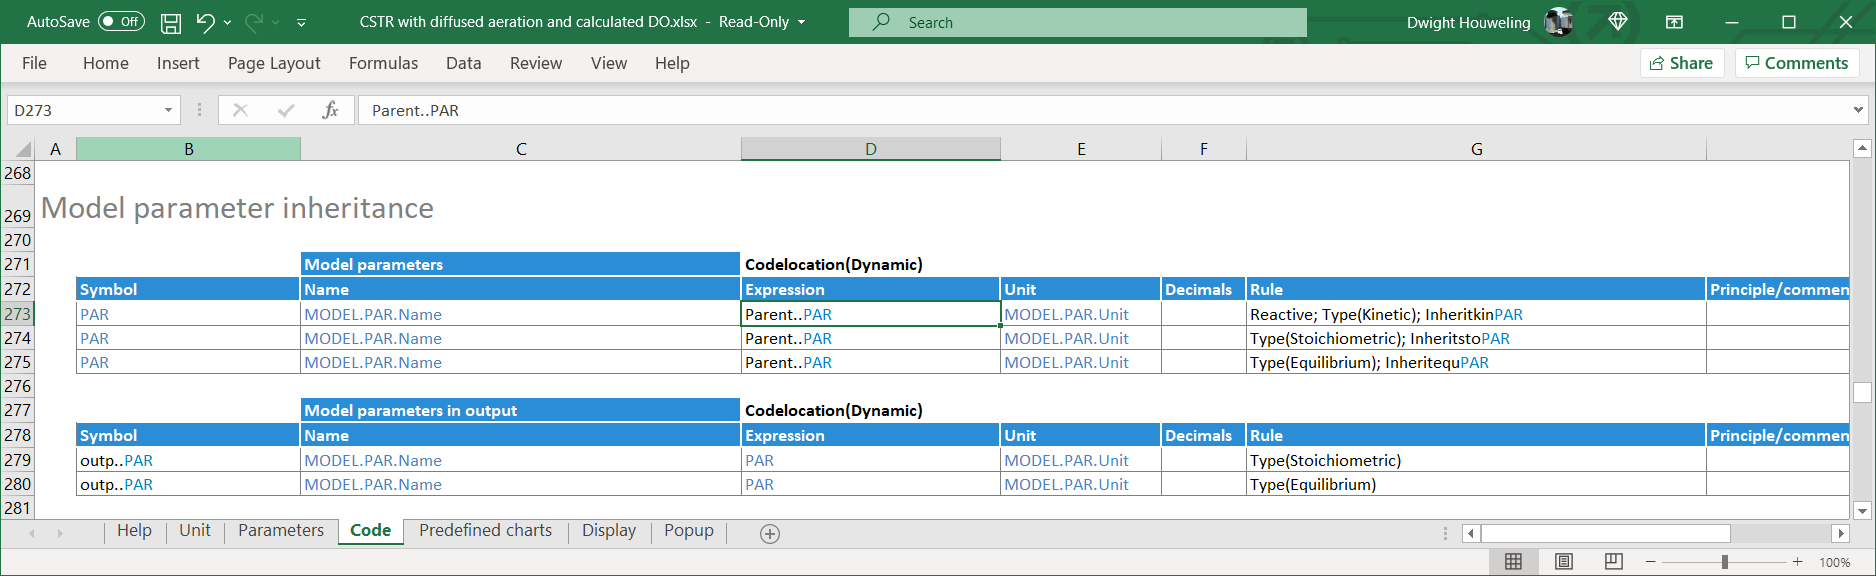
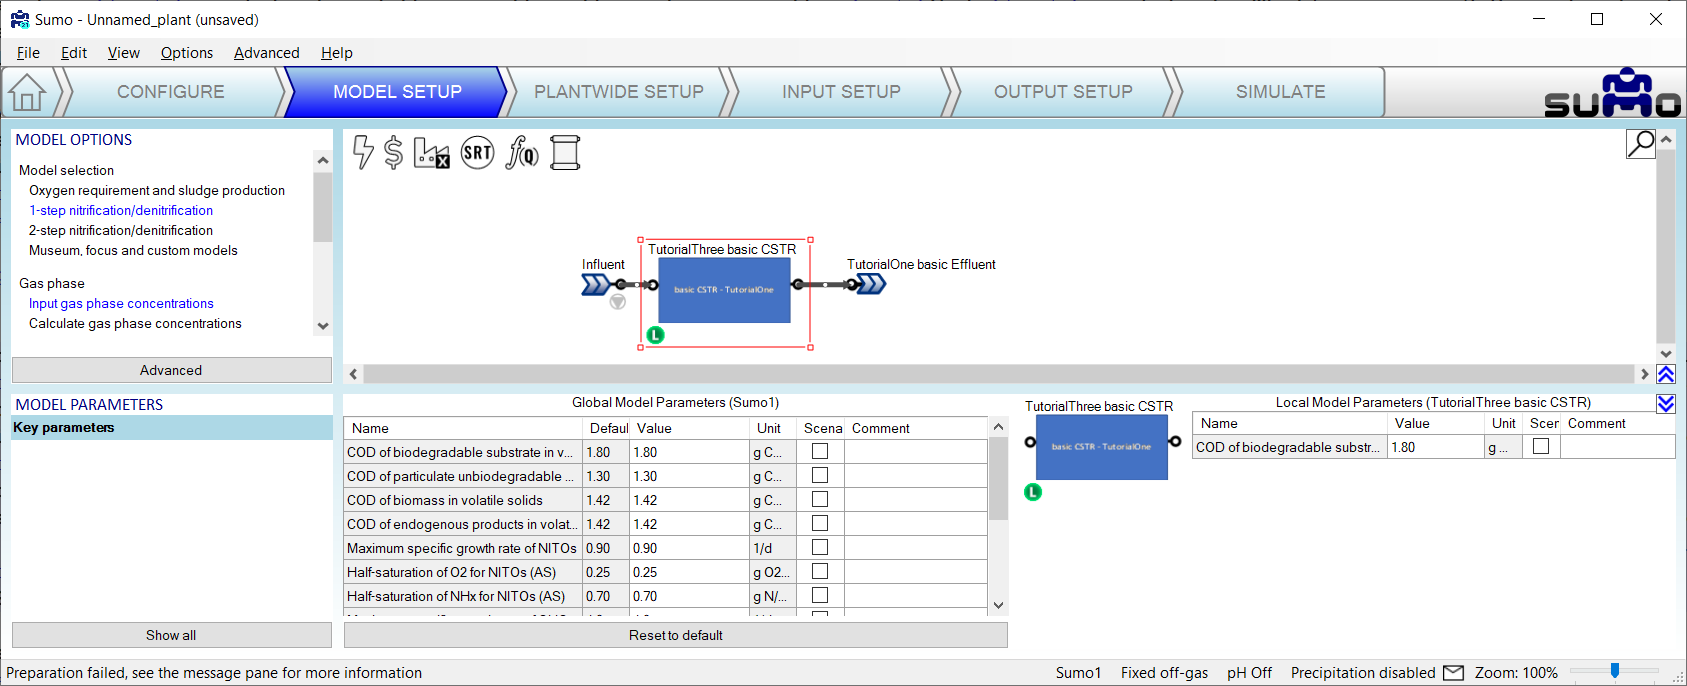
So what does this mean? What is the parent unit? In short, Parent..PAR can be thought of as a set of "Global parameters" that are applied to all process units in the SUMO flowsheet. "Local parameters" only apply if the user makes "local" changes to the Key parameters as shown below. If local changes are made, then the relevant inheritance parameters (InheritkinPAR, InheritstoPAR and/or InheritequPAR) for this process unit will switch to FALSE.
[13] Located on my computer at C:\Users\cdhou\AppData\Local\Dynamita\Sumo21\Process code\Process units\Bioreactors\CSTR\CSTR with diffused aeration and calculated DO.xlsx